Téléchargement simple et sécurisé vers le NAS QNAP
MASV permet aux équipes et aux clients de glisser-déposer en toute sécurité des fichiers volumineux dans votre NAS QNAP, avec une configuration minimale et sans transfert de port.
Lisez le tutoriel complet ci-dessous.

Téléchargement rapide de fichiers volumineux
Les contributeurs peuvent faire glisser et déposer des fichiers dans une fenêtre de navigateur sécurisée pour livrer rapidement les fichiers sur votre stockage QNAP via l'auto-analyse.
Accès sécurisé
Permettez à certains membres de l'équipe d'accéder à votre NAS QNAP en utilisant uniquement MASV, sans avoir à se préoccuper des autorisations système ou des ports.
Une mise en œuvre facile
Installez MASV sur QNAP en quelques minutes. Utilisez MASV pour suivre les livraisons de fichiers et gérer les accès privilégiés à votre appareil à l'aide de notre application Web.
Préparation du tutoriel
Dans le tutoriel suivant, vous apprendrez comment :
- Installer le Agent MASV sur un NAS QNAP.
- Créez une connexion sécurisée à votre NAS QNAP dans l'application Web MASV.
- Utilisez MASV Portals pour ingérer les fichiers des contributeurs directement dans votre espace de stockage QNAP.
Ce dont vous avez besoin :
- A Compte MASV.
- Un NAS QNAP pour lequel vous avez des privilèges d'administrateur pour le QTS ou QuTSCloud (logiciel QNAP).
Pour ce tutoriel, nous allons installer l'image Docker de l'agent MASV. Pour plus d'informations sur les plates-formes prises en charge, visitez le site Configuration de l'agent MASV.
Temps de réalisation : Environ 15 minutes.
💡 Note : Si vous souhaitez obtenir des informations plus détaillées sur l'agent MASV, vous trouverez des commandes, des paramètres et bien d'autres choses encore dans la section MASV Documentation pour les développeurs.
C'est tout ! Il est temps d'installer l'agent MASV.
Installer l'agent MASV
Vous pouvez installer l'agent MASV à l'aide de la commande Station de conteneurs disponible dans le QNAP QTS ou QuTScloud.
Vous pouvez utiliser Station de conteneurs pour extraire l'image MASV de Docker Hubet créez et configurez un conteneur. Vous devrez créer ou choisir des dossiers à mapper à vos volumes MASV Agent avant de pouvoir configurer le conteneur.
Installation d'une station de conteneurs
Si Container Station n'est pas déjà installé avec votre logiciel QTS, vous pouvez suivre les instructions ci-dessous.
1. Ouvrez votre logiciel QTS, et ouvrez App Center.
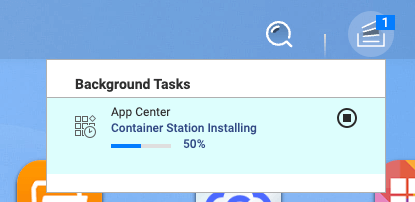
2. Recherchez dans l'App Center Station de conteneurset sélectionnez Installer. L'application s'installe en arrière-plan.
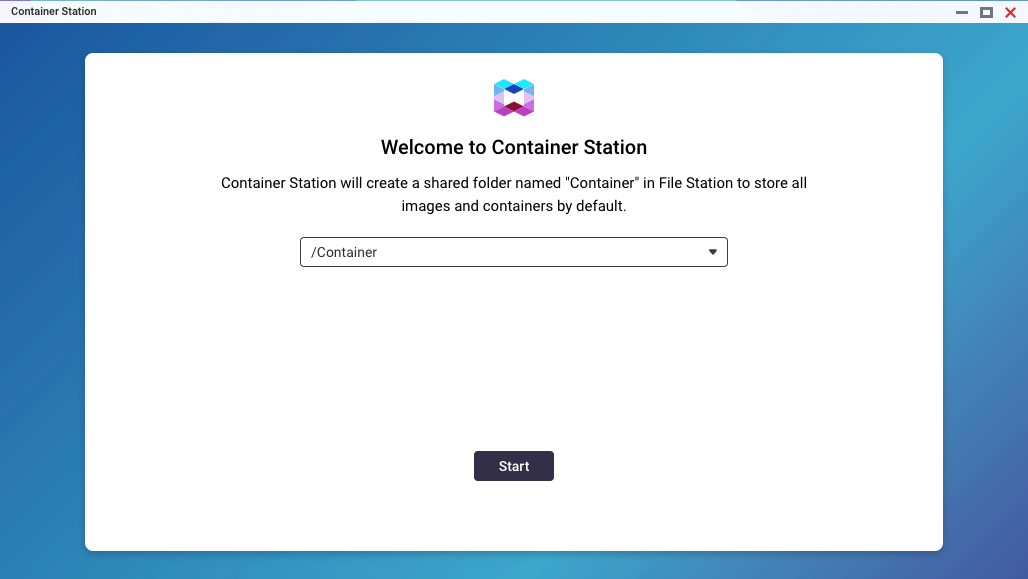
3. Sur l'écran Bienvenue sélectionnez Démarrer pour accepter l'emplacement par défaut de l'image et ouvrir l'application.
Préparer une structure de fichier dans File Station
Avant de créer un conteneur pour MASV, vous devez créer ou identifier l'endroit où vous mapperez les volumes du conteneur.
Pour ce tutoriel, nous allons créer un fichier masv dans le stockage de votre appareil QNAP avec deux sous-dossiers par défaut : config (pour les fichiers de configuration de l'agent MASV, y compris settings.yml) et données (l'emplacement où les fichiers téléchargés seront livrés).
1. Dans le logiciel QNAP QTS, sélectionnez Station de fichiers.
2. En Station de fichiersCréez la structure de dossiers que vous souhaitez utiliser ou vérifiez que vous disposez d'une structure de dossiers existante que vous pouvez utiliser.
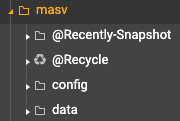
Extraire l'image de l'agent MASV et créer un conteneur
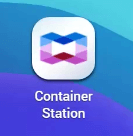
1. Dans votre logiciel QNAP QTS, ouvrez Station de conteneurs.
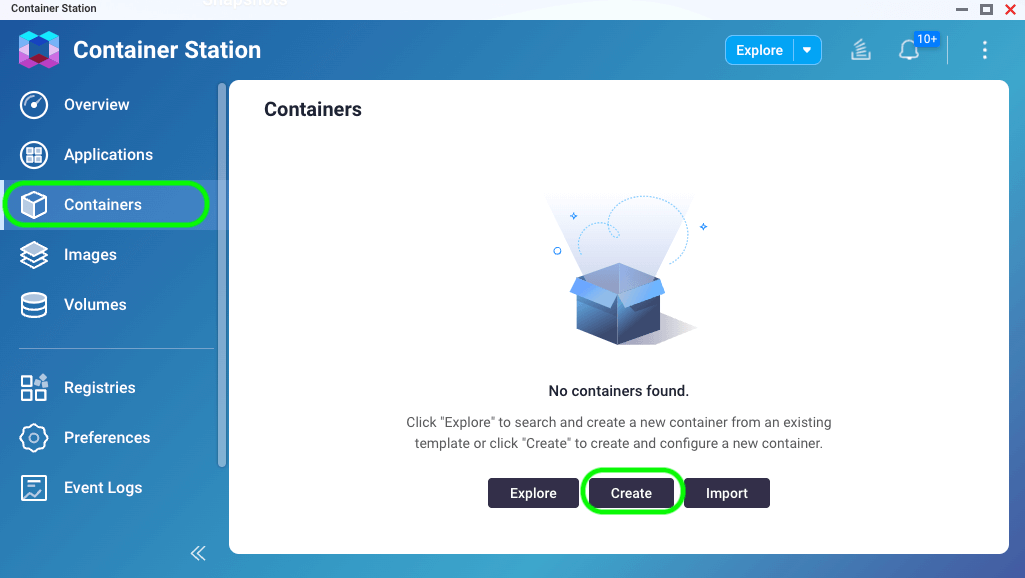
2. Dans le Gestionnaire de conteneurs, sélectionner Conteneur dans la barre latérale de gauche, et sélectionnez l'option Créer bouton.
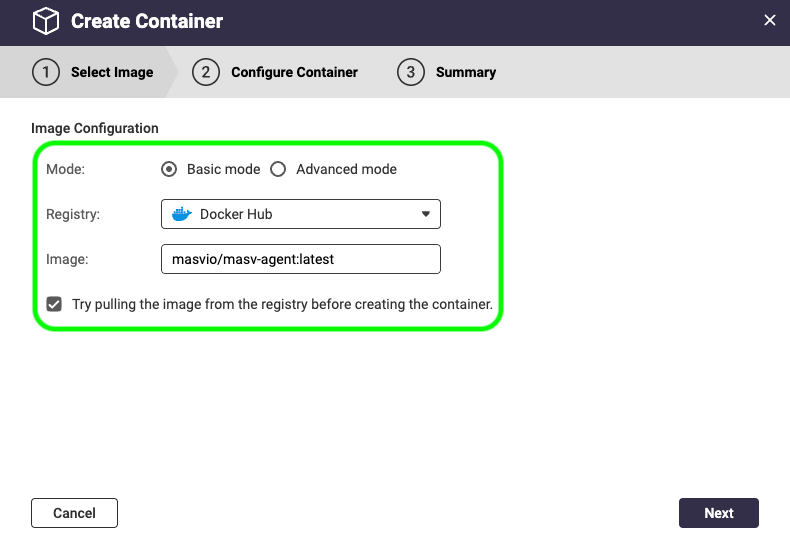
3. Dans le Créer un conteneur dans la fenêtre Sélectionner une image sélectionnez les éléments suivants :
- Mode: Sélectionner De base mode.
- Registre: Sélectionner Docker Hub.
- Image: Copiez et collez l'image de référence suivante : masvio/masv-agent:latest.
- Sélectionnez l'option Essayez d'extraire l'image du registre avant de créer le conteneur. case à cocher.
4. Sélectionner Suivant.
5. Sur l'écran Configurer le conteneur tapez un nom pour le conteneur.
6. Nous recommandons de régler le Politique de redémarrage à Toujours. Pour ce tutoriel, nous accepterons toutes les valeurs par défaut de l'option Configuration du réseau paramètres.
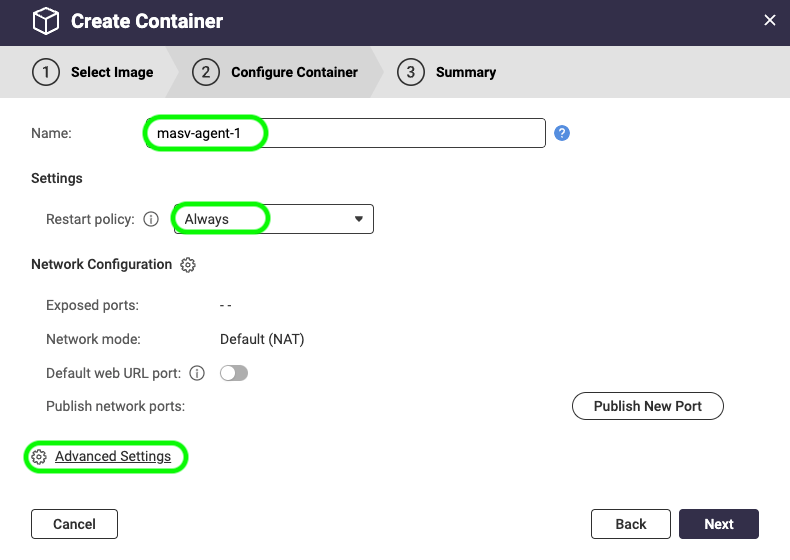
7. Sélectionnez l'option Paramètres avancés et dans le lien Paramètres avancés sélectionnez Stockage dans la barre latérale.
8. Commencez par faire table rase du passé en sélectionnant le Supprimer ![]() à droite de l'icône Volume boîte.
à droite de l'icône Volume boîte.
9. De la Ajouter du volume sélectionner Chemin d'accès à l'hôte de montage.
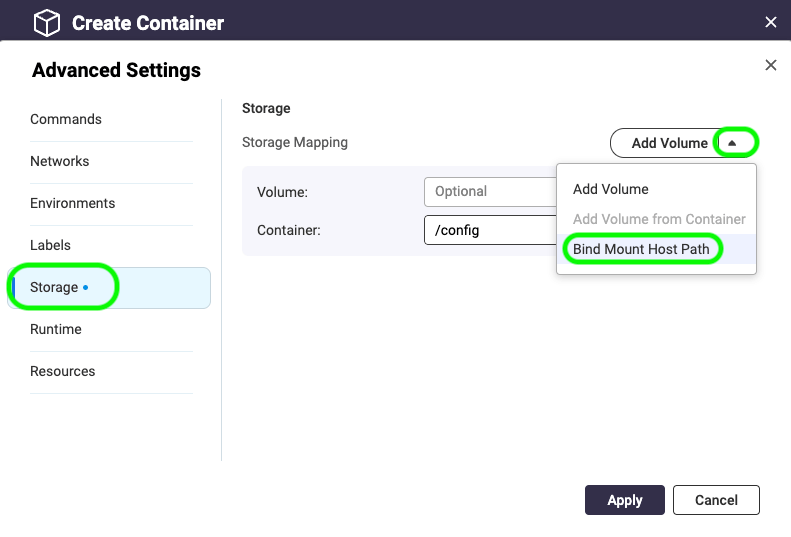
10. Pour définir un Hôte sélectionnez le dossier jaune Parcourir ![]() et naviguez jusqu'au dossier dans lequel vous souhaitez stocker les fichiers de configuration MASV. Nous choisirons masv/configet sélectionnez Appliquer.
et naviguez jusqu'au dossier dans lequel vous souhaitez stocker les fichiers de configuration MASV. Nous choisirons masv/configet sélectionnez Appliquer.
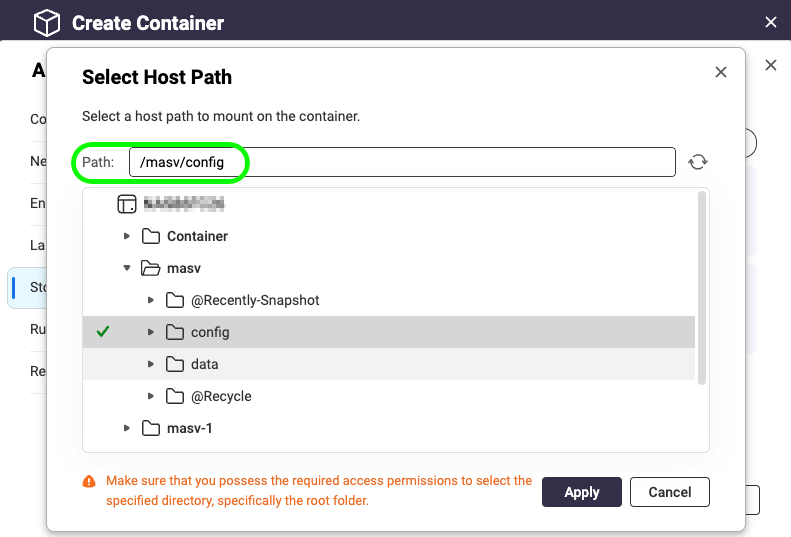
11. Dans le Conteneur tapez /config. Vous pouvez laisser le RW (pour lecture/écriture) en l'état.
12. De la Ajouter du volume sélectionner Chemin d'accès à l'hôte de montage et répétez les étapes pour créer un dossier à partir duquel vos fichiers seront téléchargés ou téléversés. Pour Hôte nous utiliserons masv/data et pour Container, nous entrerons /données.
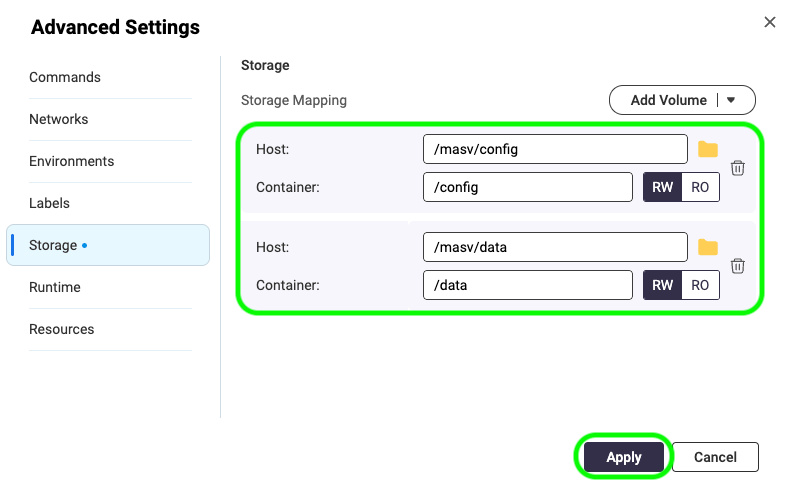
13. Sélectionner Appliquer pour fermer Paramètres avancés, Suivantet ensuite Finition. Dans quelques instants, votre nouveau conteneur MASV Agent s'affiche dans l'espace de travail. Conteneurs liste.

Nous allons maintenant ouvrir l'application Web MASV pour créer une intégration avec l'appareil QNAP.
Créer une connexion sécurisée à votre NAS QNAP dans l'application Web MASV
Dans l'application Web MASV, nous établirons une connexion sécurisée en enregistrant un identifiant et une clé secrète avec l'appareil QNAP.
Lors de la mise en place de l'intégration QNAP, nous devons choisir une direction (Sauvegarder dans la mémoire ou Envoi à partir de l'entrepôt). Nous mettrons en place un Sauvegarder dans la mémoire mais vous pouvez facilement répéter le processus pour mettre en place une intégration Send de l'entreposage et de l'intégration.
1. Se connecter à l'application MASV Web Appet dans la barre latérale de gauche, sélectionnez Intégrations.
2. Sur l'écran Intégrations Sélectionnez la page Intégrations disponibles et sélectionnez QNAP.

3. Dans le Ajouter l'intégration tapez un nom dans la fenêtre Nom de la connexion boîte.
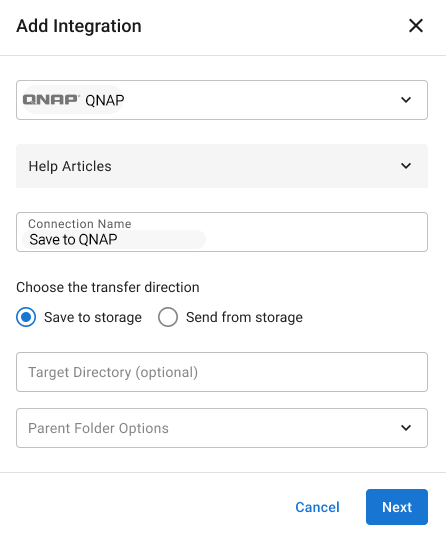
4. Pour les Direction du transfert sélectionnez l'option Sauvegarder dans la mémoire pour permettre à MASV d'envoyer des fichiers à votre appareil QNAP.
- (Facultatif) Lorsque vous choisissez Sauvegarder dans la mémoirevous avez la possibilité de fixer un Répertoire des cibles (doit être un dossier existant) et Options du dossier parent (nom du paquet utilisé pour créer un dossier). Ils sont relatifs au chemin d'accès à la racine et sont ajoutés comme indiqué dans l'exemple suivant : /data/{répertoire cible}/{nom du paquet}/{fichiers ou dossiers transférés}.
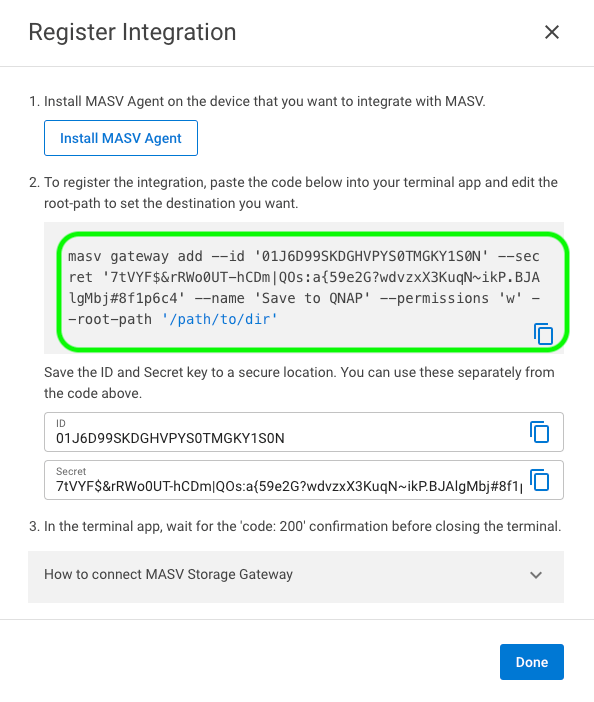
5. Sélectionner Suivantet dans le Intégration du registre ignorez l'étape 1 (l'installation de l'agent MASV est déjà effectuée).
6. Copiez le bloc de code de l'étape 2. Note : L'ID et le secret sont inclus dans le bloc de code. Si vous êtes familier avec le CLI de MASV Agent et que vous souhaitez gérer les connexions manuellement, l'ID et le Secret sont fournis sous le bloc de code.
Nous allons maintenant ouvrir une fenêtre de terminal pour le conteneur MASV Agent.
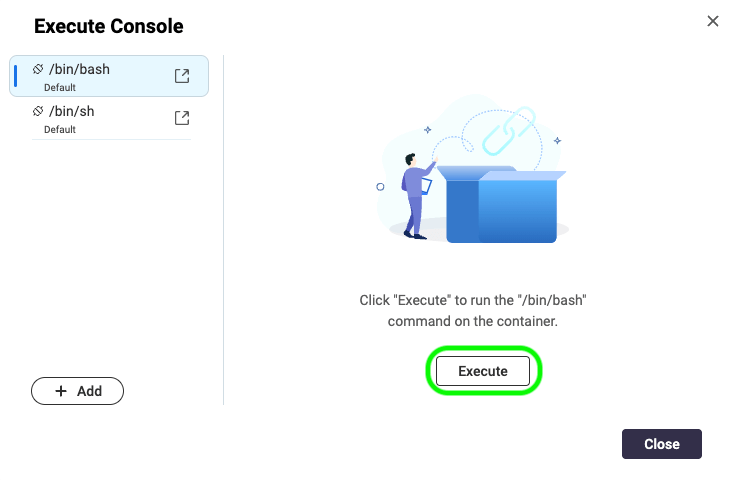
7. Dans le Station de conteneurs, sélectionner Conteneurs dans la barre latérale, et sélectionnez le nom du conteneur (masv-agent-1) pour afficher les détails et l'état du conteneur.

8. Sélectionnez l'option Exécuter pour ouvrir la fenêtre Exécuter la consoleet sélectionnez Exécuter pour ouvrir une fenêtre de terminal.
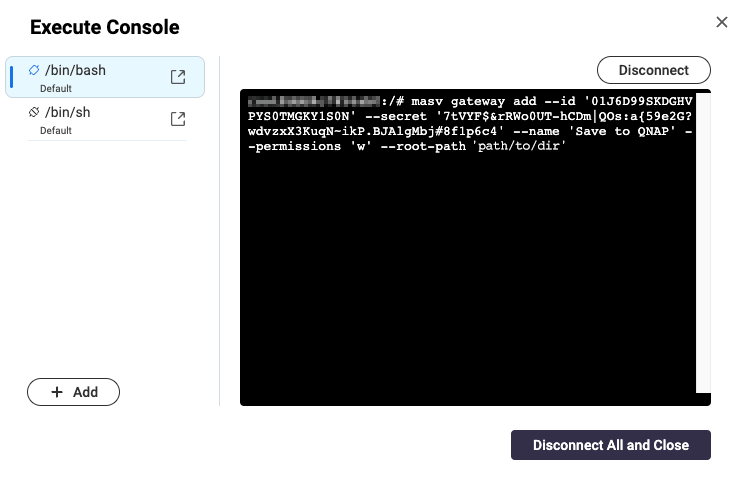
9. Collez le code que vous avez copié depuis l'application Web MASV dans la fenêtre Terminal.

10. Dans la fenêtre du terminal, modifiez le fichier -Chemin d'accès racine texte de remplacement ('path/to/dir' (chemin/vers/répertoire)) pour définir le répertoire sur les données : -root-path '/data' (chemin racine)et appuyez sur Entrer. Une connexion réussie affiche "code" : 200.
11. Dans le MASV Web App, dans le Intégration du registre sélectionnez Terminé.
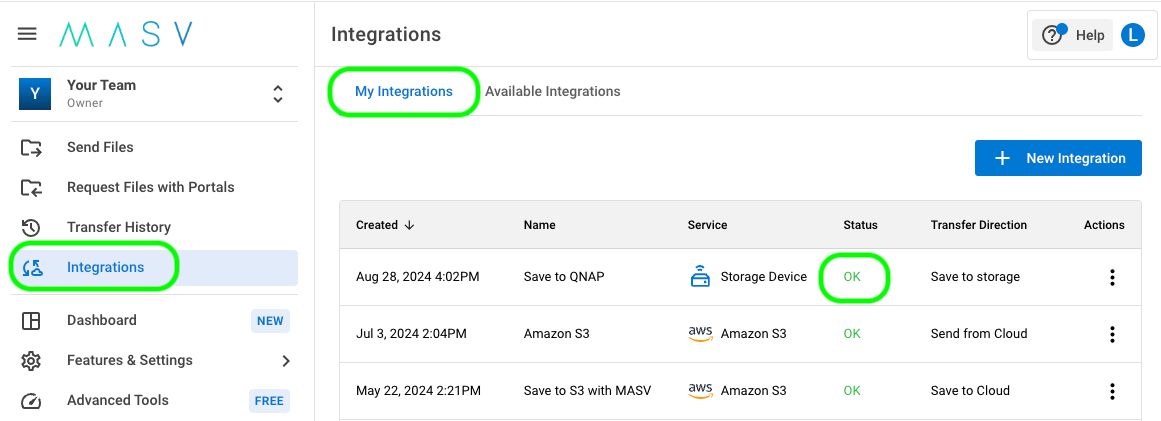
12. Sur le Intégrations sélectionner la page Mes intégrations rafraîchissez la page du navigateur et confirmez que l'onglet Statut pour le NAS QNAP s'affiche OK.
Enregistrez des fichiers sur votre NAS QNAP avec MASV Portals
Les portails MASV sont des outils de téléchargement en ligne qui facilitent la collecte de fichiers auprès des contributeurs et leur transfert vers l'espace de stockage de votre choix. Voyons comment ce processus fonctionne avec notre nouvelle intégration de stockage QNAP.
Vous aurez d'abord besoin d'un Portail MASV. Si vous n'en avez pas encore, vous pouvez en créer un dans la rubrique MASV Web App.
Des instructions complètes sont disponibles dans l'aide : Comment créer, modifier ou supprimer un portail ?. Vous pouvez créer un portail instantané en quelques clics, ou créer un portail personnalisé.
1. Dans le MASV Web App, sélectionner Demande de fichiers avec les portails dans la barre latérale de gauche.
2. Sur l'écran Demande de fichiers avec les portails choisissez un portail, et dans la page Actions sélectionnez l'icône de menu [trois points verticaux], puis sélectionnez Modifier.
3. Sur l'écran Editer le portail Sélectionnez la page Intégrations et dans l'onglet Statut activez la bascule pour l'intégration de votre QNAP.
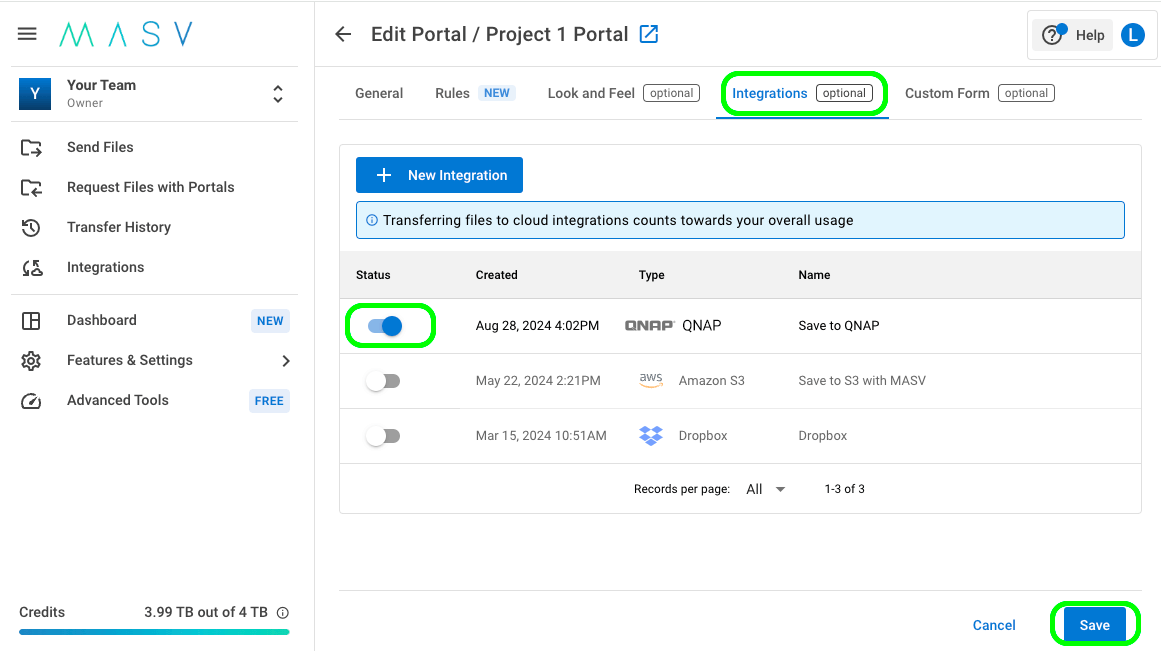
4. Sélectionnez le Sauvez dans le coin inférieur droit de la page pour appliquer les modifications.
5. Revenir au Demande de fichiers avec les portails page. Vous êtes maintenant prêt à envoyer une demande de fichier.
6. Sélectionnez l'option Actions de votre portail, et sélectionnez Envoyer la demande de téléchargement dans le menu.
7. Remplir le Envoi d'une demande de téléchargement par courrier électroniqueen ajoutant les destinataires de l'e-mail et le message que vous souhaitez envoyer.
8. Sélectionnez l'option Envoyer une demande pour fermer la fenêtre.
Que se passe-t-il ensuite ?
1. Les destinataires d'emails listés dans votre demande de téléchargement reçoivent un email avec un lien vers votre portail.
2. À l'aide de son navigateur web, le destinataire du courrier électronique peut faire glisser et déposer les fichiers sur la page du portail et envoyer les fichiers sous forme de paquet.
4. En tant que propriétaire du portail, vous recevrez, en plus d'un courriel de notification de colis, un courriel de notification lorsque les fichiers auront été livrés sur votre espace de stockage Synology.
💡 Conseil : Au lieu de surveiller les fichiers reçus par courrier électronique, vous pouvez passer en revue tous les paquets envoyés ou reçus dans la rubrique MASV Web App. Sélectionner Historique des transferts dans la barre latérale, et sur la page Historique des transferts Sélectionnez la page Reçu pour afficher la liste de tous les colis reçus.
Vous pouvez faire défiler l'écran de gauche à droite pour afficher toutes les informations. Actions colonne, sélectionnez l'icône et cliquez sur Détails du paquet pour plus d'informations, y compris un journal de livraison.
💡 Conseil : Les paquets actifs dans votre Historique des transferts peut facilement être envoyé à n'importe laquelle de vos intégrations, y compris QNAP. Il vous suffit de sélectionner un paquet dans le menu Envoyé ou Reçu et dans l'onglet Actions colonne, sélectionnez l'icône et cliquez sur Envoyer un paquet dans le nuage. Sélectionnez l'intégration souhaitée dans la liste, puis sélectionnez Confirmer.
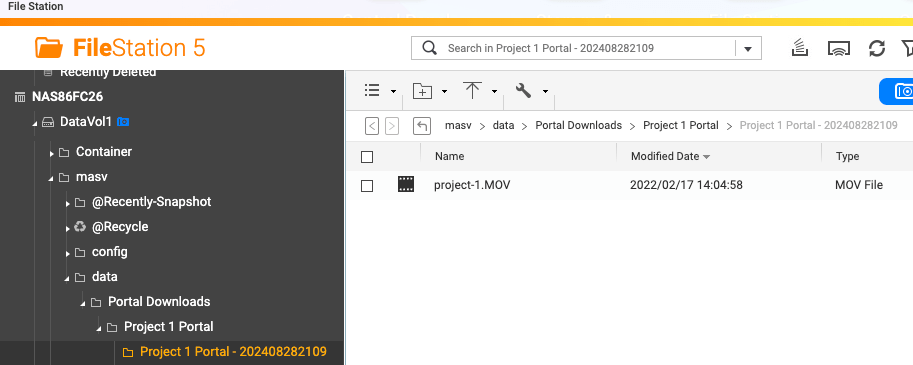
Les fichiers sont enregistrés à l'emplacement par défaut (/data/MASV) ou vers le répertoire cible configuré dans l'intégration.
Vous voulez vérifier ? Sur votre appareil QNAP, ouvrez Station de fichierset naviguez jusqu'à votre dossier mappé. Si vous n'avez pas défini de répertoire cible facultatif, vos fichiers sont enregistrés à l'emplacement par défaut suivant : Portail Téléchargements > [Nom du portail] > [Nom du paquet].
Félicitations ! Vous avez installé l'agent MASV, mis en place une intégration dans l'application MASV Web AppVous pouvez créer autant d'intégrations et de portails MASV que nécessaire pour organiser vos transferts de fichiers, vos équipes et vos projets. Vous pouvez créer autant d'intégrations et de portails MASV que nécessaire pour organiser vos transferts de fichiers, vos équipes et vos projets.
Prochaines étapes
Nos clients intègrent MASV à leur flux de travail de multiples façons, qu'il s'agisse de gérer les téléchargements à partir d'un point central ou de tirer parti des fonctions avancées du logiciel MASV. Application de bureau MASVL'API MASV permet de créer des flux de travail personnalisés.
Pour plus d'informations sur l'API MASV, consultez notre site web Documentation pour les développeurs MASV.
Essayez l'intégration de MASV avec les NAS de Synology
Utilisez MASV et le stockage Synology pour accélérer les flux de travail d'ingestion de contenu vers le stockage.