Easy, Secure Upload to Synology NAS for Teams
Turn your Synology NAS into a collaborative hub with drag-and-drop uploads for teams and clients via the secure MASV transfer platform.
No port-forwarding. Minimal configuration. Read the full tutorial below.

Effortless Upload
Hassle-free uploads without ports, plugins, or individual permissions. Just set the destination, share a link, and you’re all set.
Easy Implementation
Set up MASV on Synology in just 15 minutes. Once set, you can track deliveries and manage access through our Web app.
Automated Transfers
Our upload feature auto-ingests files into your chosen Synology directory, freeing you up for other tasks.
Tutorial Preparation
In the following tutorial, you’ll learn how to:
- Install the Agente del MASV on a Synology NAS.
- Create a secure connection to your Synology NAS in the MASV Web App.
- Use MASV Portals to ingest files from contributors directly to your Synology storage.
What you’ll need:
- Un Cuenta MASV.
- A Synology NAS for which you have administrator privileges for the DSM (DiskStation Manager software).
For this tutorial, we’ll install the Docker image of the MASV Agent. For information about supported platforms, visit MASV Agent Setup.
Time to complete: Approx. 15 min.
💡 Note: If you’re looking for more detailed info about the MASV Agent, you’ll find commands, parameters, and more in the MASV documentación para desarrolladores.
That’s all! Time to install the MASV Agent.
Install the MASV Agent
You can install the MASV Agent by using the Container Manager available in the Synology DSM. Start by importing the MASV Agent image, then create a container.
Import the MASV Agent Image
1. In your Synology DSM software, open Container Manager.
2. In the sidebar, select Image, and then select Importa > Add from URL.
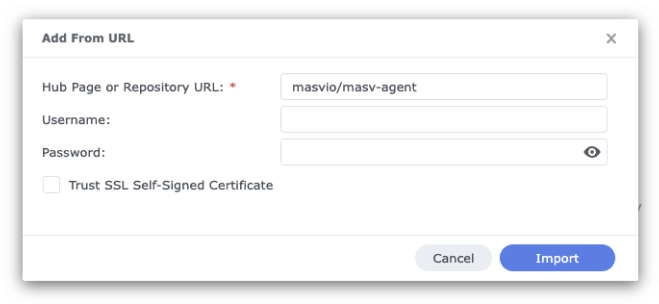
3. En las Add From URL window, copy and paste the following into the Hub Page or Repository URL box:
masvio/masv-agent
Nota: Username and Password boxes should be blank.
4. Seleccione el Importa button, and in the Choose Tag window, select latest from the Please Choose a Tag drop-down menu.
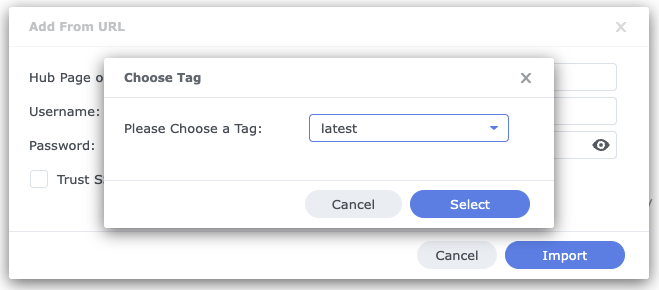
5. Pulsa Seleccionar, and within a few moments, the masv-agent image will display in the Image lista.

Create a container
1. In the Container Managerselecciona Container from the sidebar, and select the Crear botón.
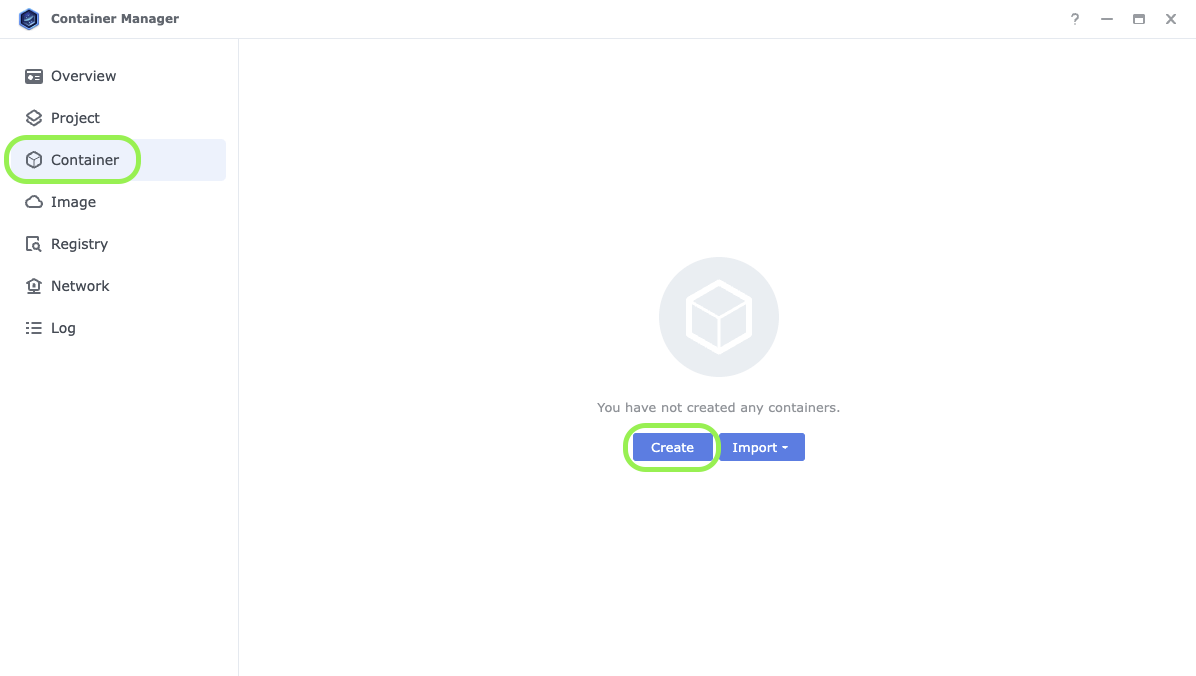
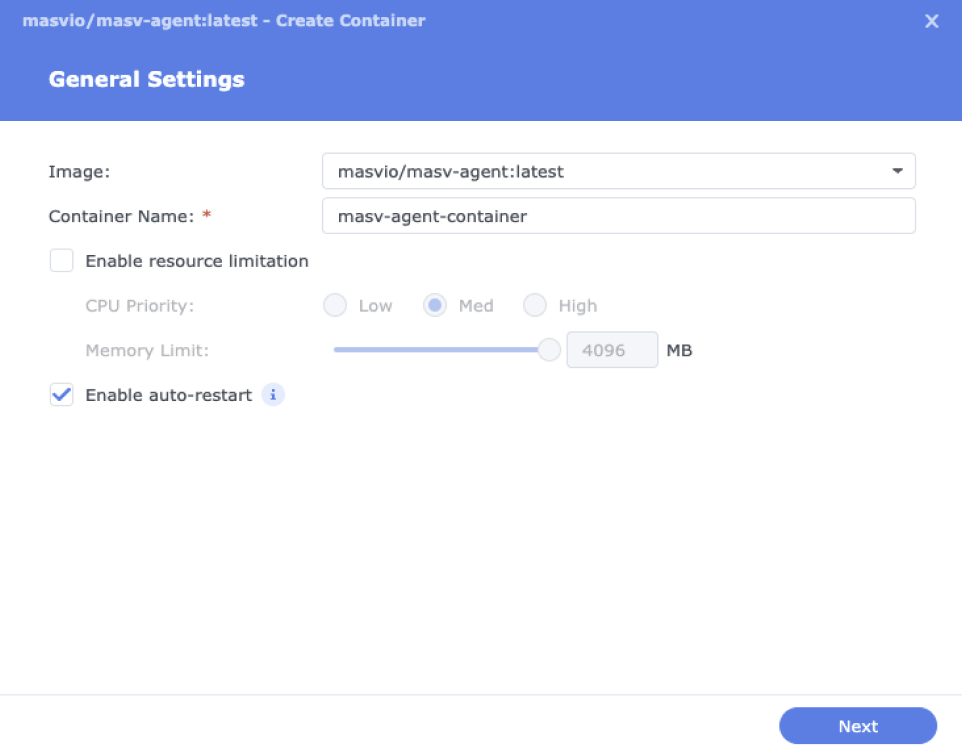
2. On the General Settings page, from the Image drop-down menu, select masvio/masv-agent:latest.
3. En las Container Name box, type a container name. For example, masv-agent-container.
4. (Optional) If you want to set resource limitations, select the Enable resource limitation checkbox and choose the settings you want.
5. Select Enable auto-restarty selecciona Next.
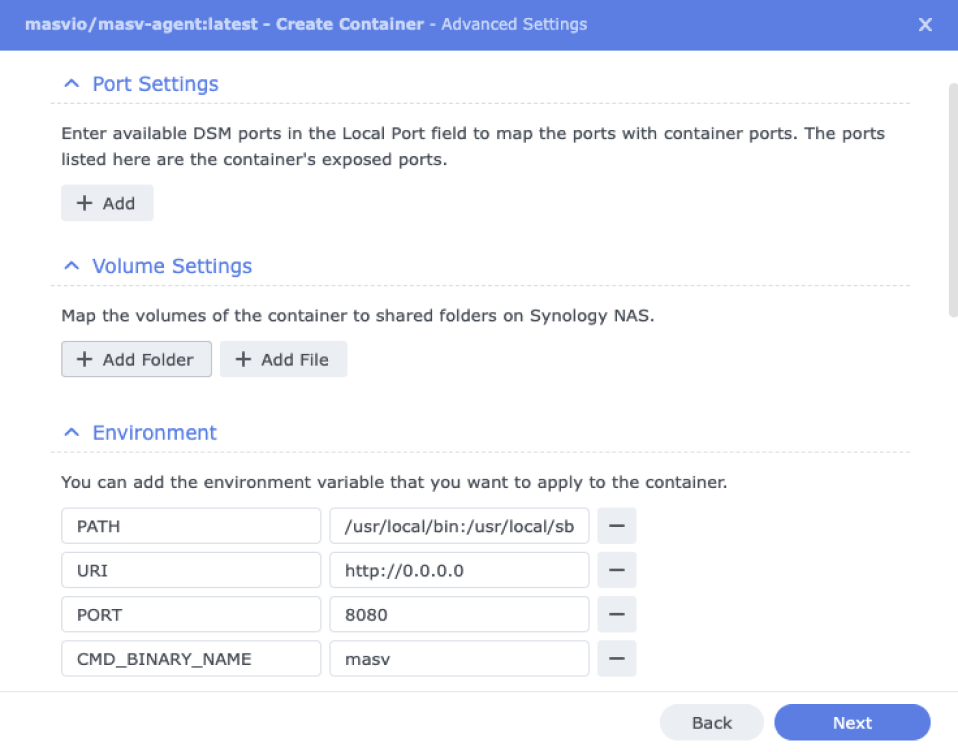
6. On the Configuración avanzada page, open the Volume Settings area. This is where we will map the volumes of the container to shared folders on your Synology device.
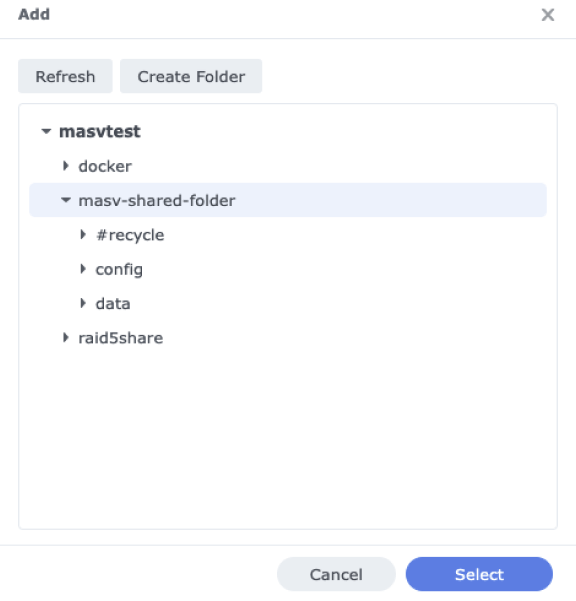
7. Select the Add Folder button, and in the Añadir window, create or select the shared folders you want to use. MASV Agent uses the default folders /config y /data. For simplicity, we’ll create a folder (masv-shared-folder) with config y data subfolders.
8. Click the Seleccionar button to choose the first folder you want, then repeat the process for the second folder.
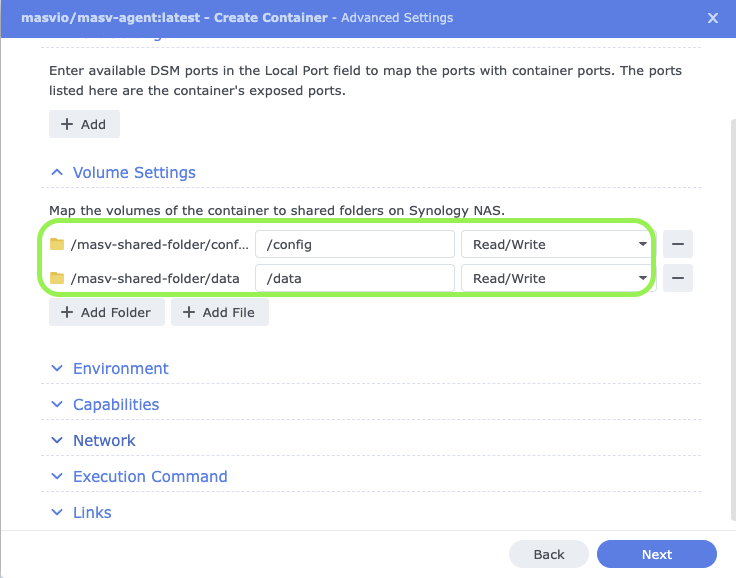
9. In the Volume Settings area, map the folders you selected to /config y /data, and choose Read/Write to allow MASV to send files to your Synology device.
10. Select Next, review the Resumen page, and select Hecho.
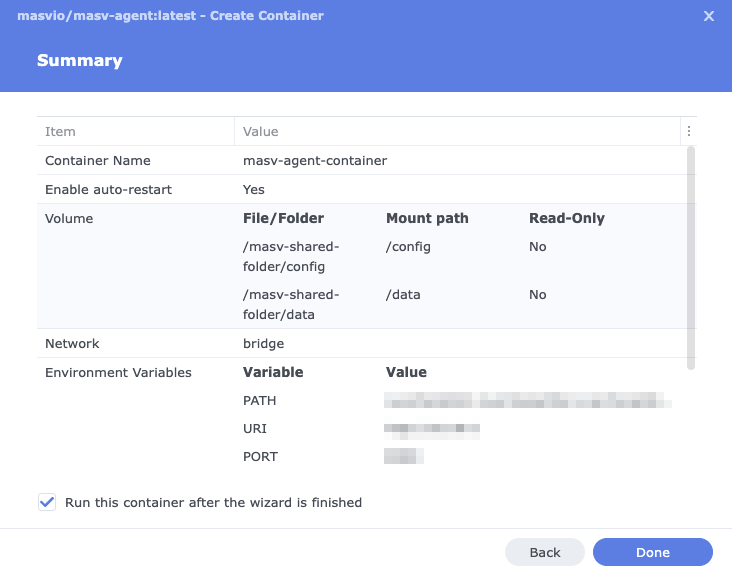
11. Verify that the container and MASV Agent installation are working by selecting Log in the sidebar on the left and checking the Log list. You should see the following event: “Start container [your MASV container name].”

You’re now ready to create a secure connection between your Synology device and the MASV Web App.
Create a Secure Connection to your Synology NAS in the MASV Web App
MASV offers a range of integration options for cloud storage, popular media apps, and media asset management software. When setting up the Synology integration, we need to choose a direction (Save to storage o Send from storage). We’ll set up a Save to storage integration, but you can easily repeat the process to set up a Send from storage integration as well.
1. Sign in to the Aplicación web MASV, and in the sidebar on the left, select Integraciones.
2. On the Integraciones page, select the Available Integrations tab, and select Synology.

3. En las Add Integration window, type a name in the Nombre de la conexión caja.
4. For the Transfer Direction option, select Save to storage to allow MASV to send files to your Synology device.
Nota: When you choose Save to storage, you have the option to set a Target Directory (must be an existing folder) and Parent Folder Options (package name used to create a folder). These are relative to the root path and are appended as shown in the following example: /data/{target directory}/{package name}/{transferred files or folders}
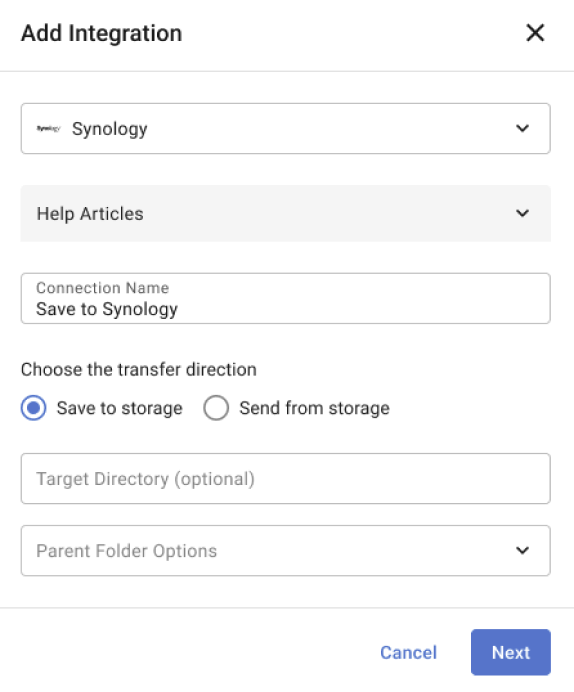
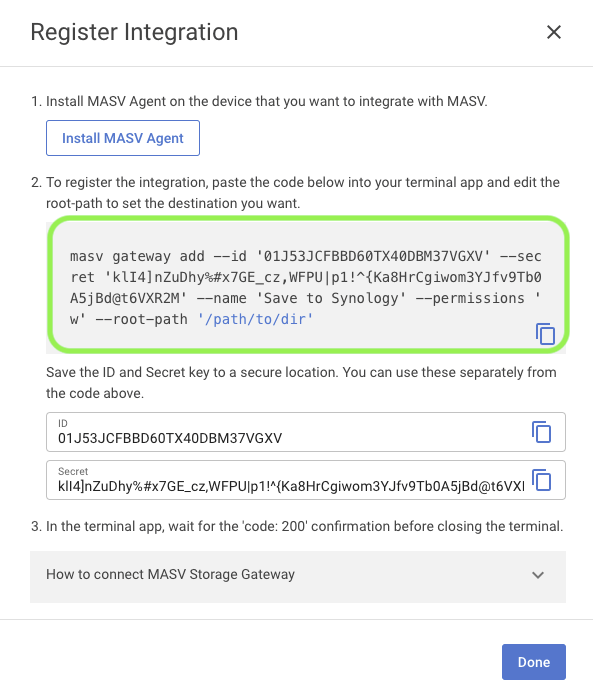
5. Select Next, and in the Register Integration window, ignore step 1 (MASV Agent installation is already done). In step 2, before we continue, it’s best to copy the ID y Secret key to a secure location.
6. Copy the block of code provided as evidenced in step 2 of the following image.
7. In the Synology Container Managerselecciona Container in the sidebar.
8. Select the MASV container name (masv-agent-container), and on the page that opens, select Action menu, Open terminal.

9. On the Terminal page, select Crear. A new Terminal window called bash is created. Select bash, and you will see root@masv-agent:/# in the window.
Consejo: If at any point the Terminal window becomes inactive, close the Terminal window, reopen it, and select Crear again.
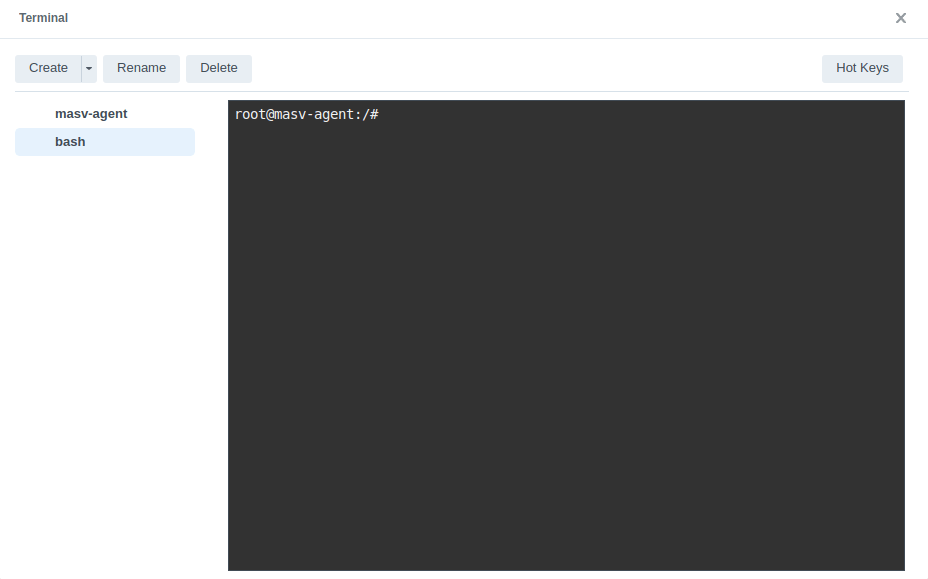
10. Paste the code that you copied from the MASV Web App into the Terminal .
Consejo: If you run into issues pasting the code, try right-clicking with your mouse and selecting Paste from the context menu. You can also click the Hot Keys button in he upper-right corner of the Terminal window and follow the instructions for pasting.

11. In the Terminal window, edit the –root-path placeholder text to set the directory to data, for example –root-path ‘/data/’, and press Enter. A successful connection displays “code”: 200.

12. In the Aplicación web MASV, in the Register Integration window, select Hecho.
13. On the Integraciones page select the My Integrations tab, refresh the browser page, and confirm that the Estado column for the Synology NAS displays OK.

Save Files to Your Synology NAS with MASV Portals
MASV Portals are web uploaders that make it easy to collect files from contributors and deliver them to your storage of choice. Lets take a look at how this process works with our new Synology storage integration.
You’ll first need a portal MASV. If you don’t already have one set up, you can create one in the Aplicación web MASV. Full instructions can be found in the Help: How to create, edit, or delete a Portal. You can create an Instant Portal in a couple of clicks, or create a Custom Portal that is brandable, sets file requirements, and collects metadata.
1. In the Aplicación web MASVselecciona Request Files with Portals from the sidebar on the left.
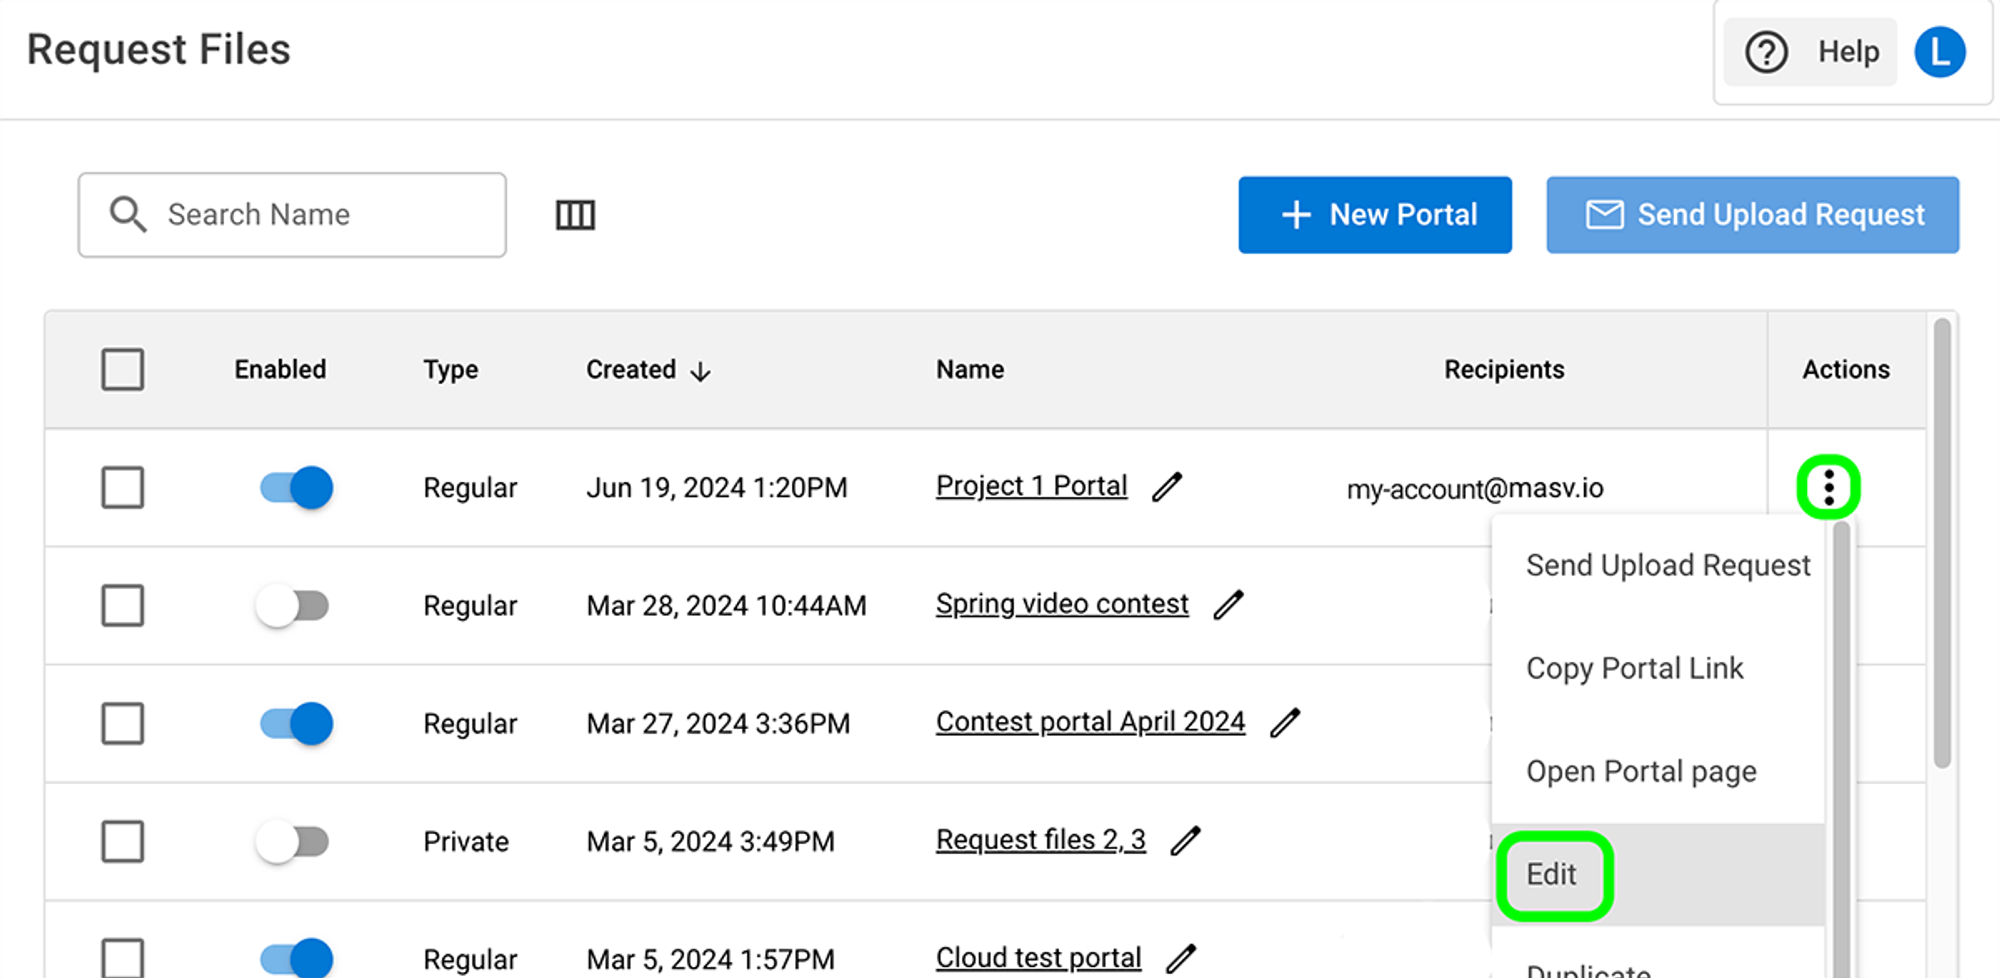
2. On the Request Files with Portals page, choose a Portal, and in the Actions column, select the menu icon [three vertical dots], and select Editar.
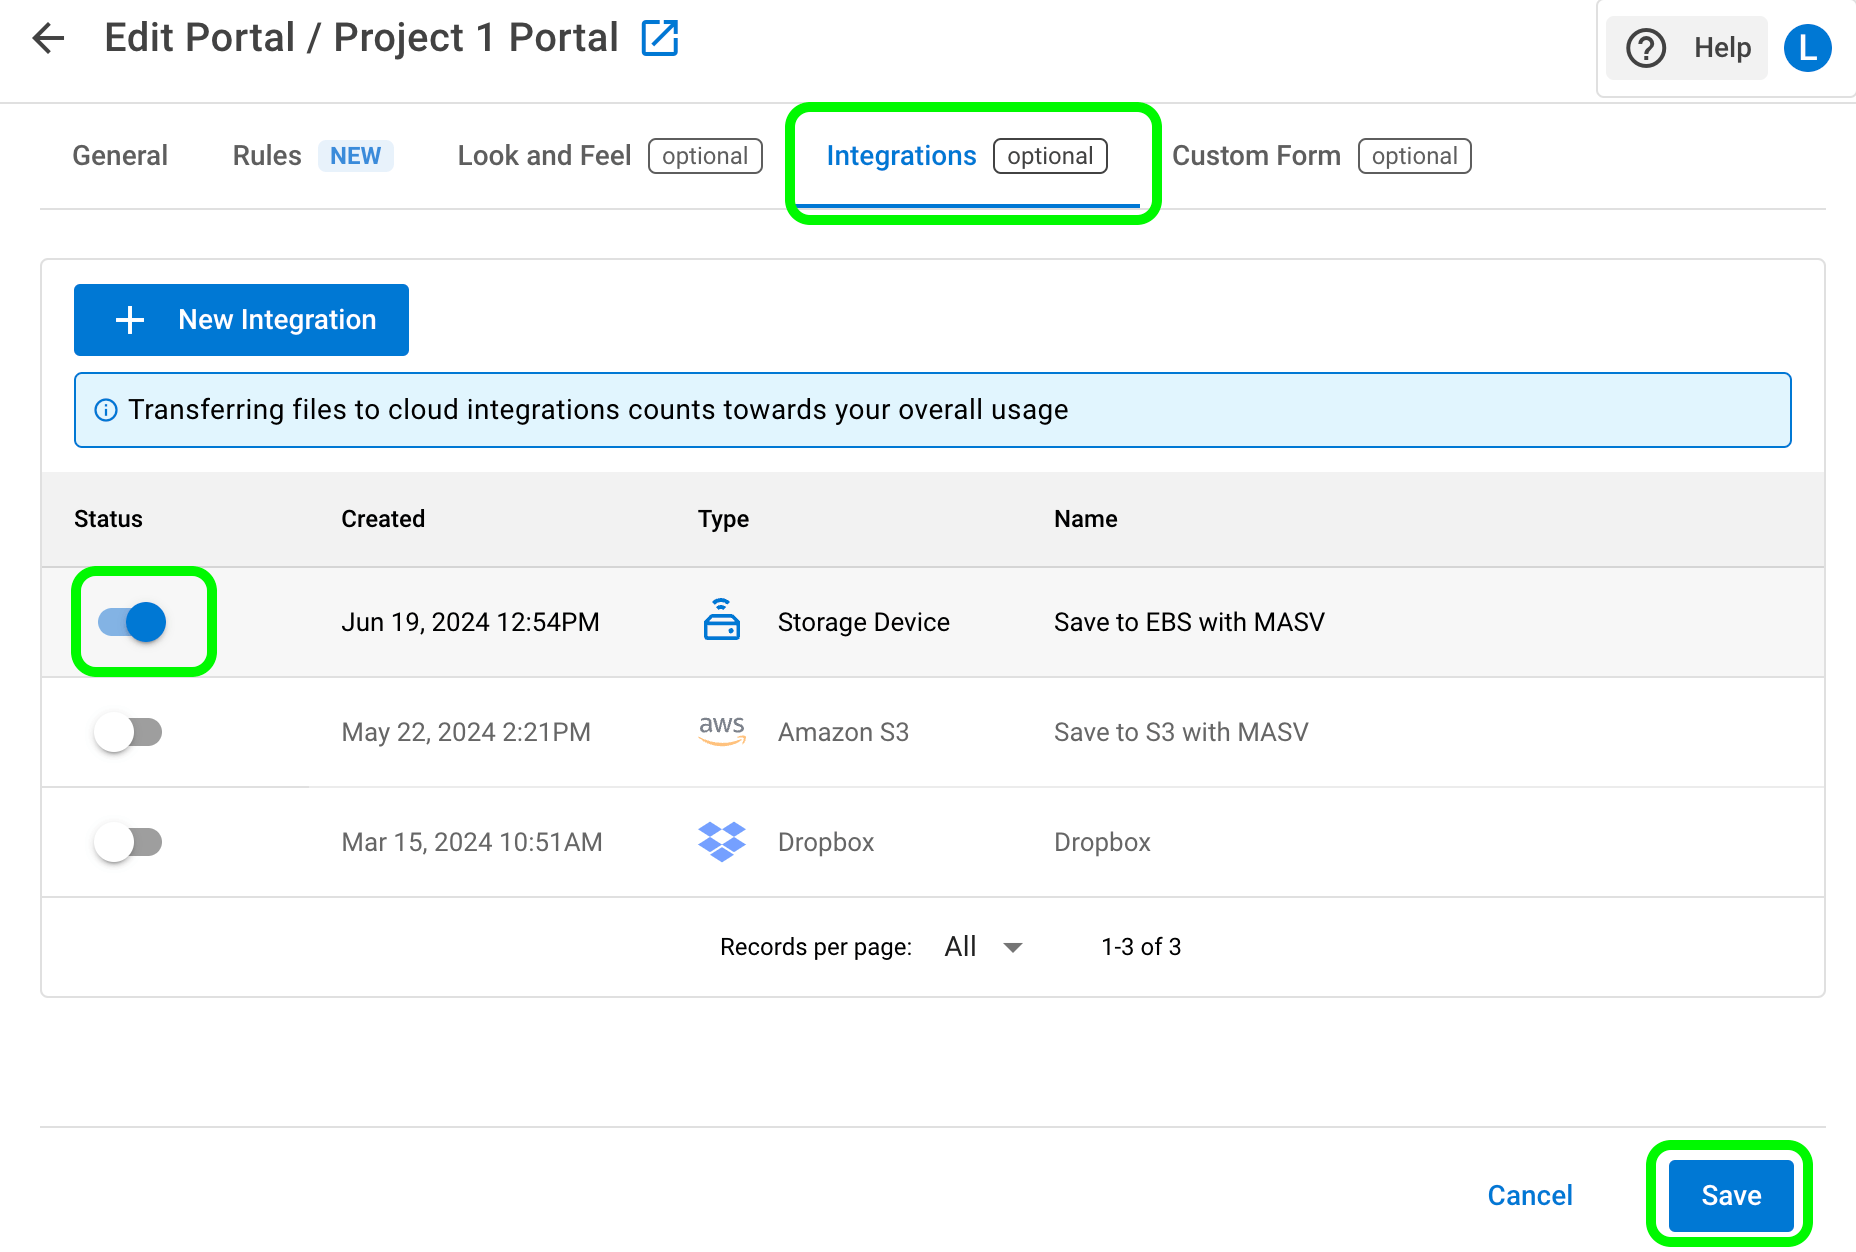
3. On the Edit Portal page, select the Integraciones tab, and in the Estado column, enable the toggle for your Synology integration.
4. Seleccione el Guardar button in the lower right corner of the page to apply the changes.
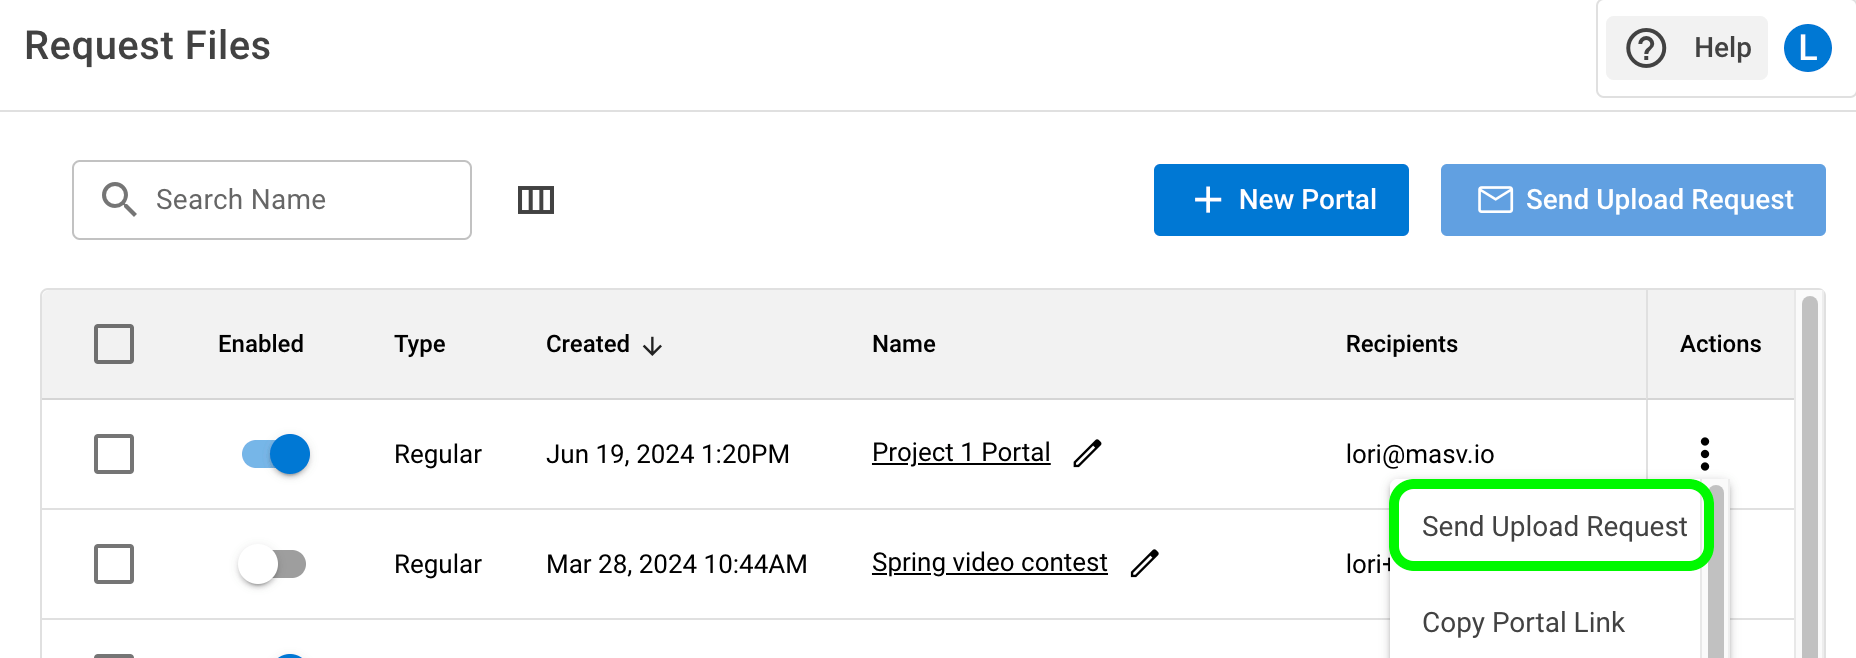
5. Return to the Request Files with Portals page. Now you’re ready to send a file request. Select the Actions menu icon for your Portal, and select Send Upload Request from the menu.
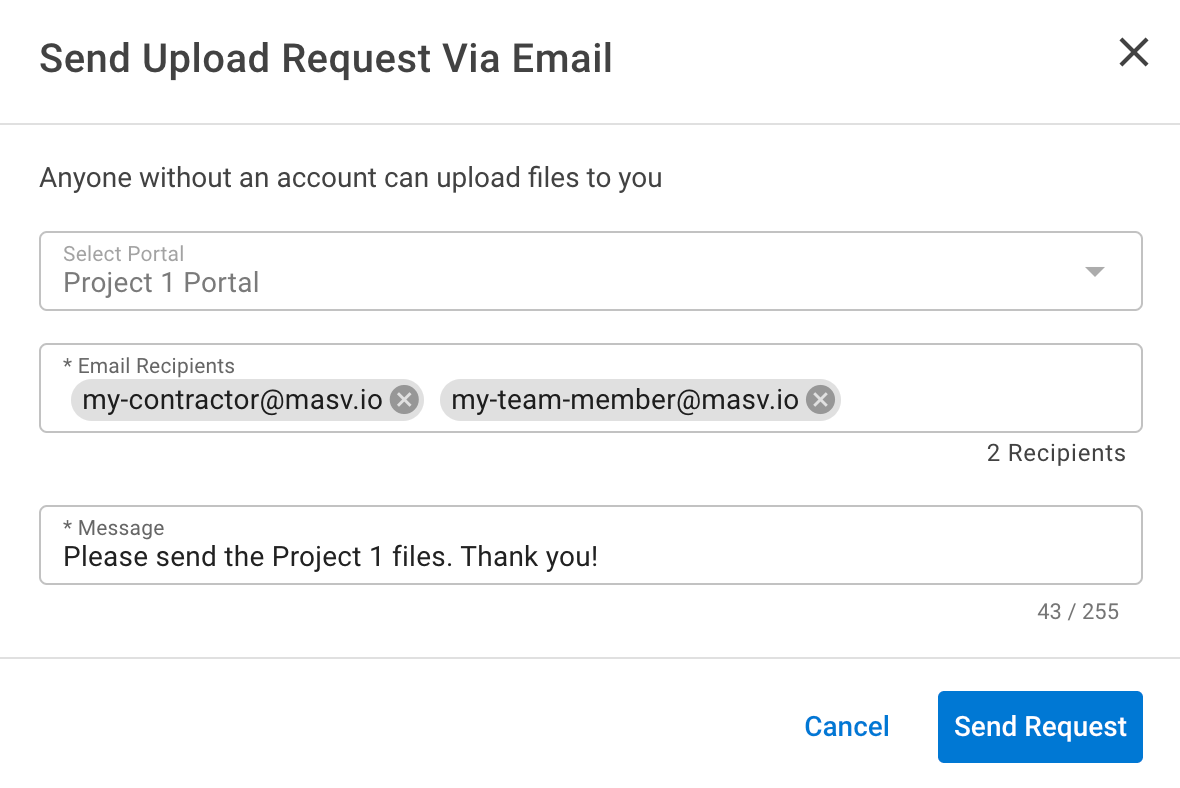
6. Fill in the Send Upload Request Via Email fields, adding the email recipients and the message that you want to send.
7. Select the Send Request button to close the window.
What Happens Next?
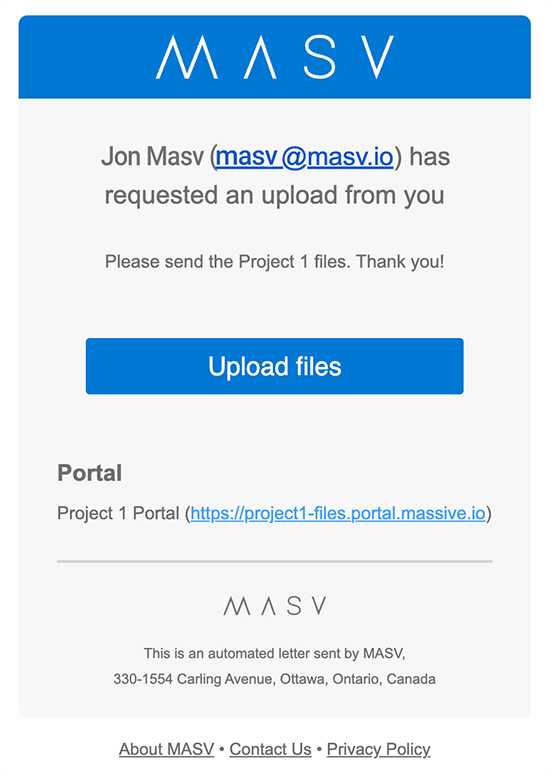
The email recipients listed in your upload request receive an email with a link to your Portal.
1. The email recipients listed in your upload request receive an email with a link to your Portal.
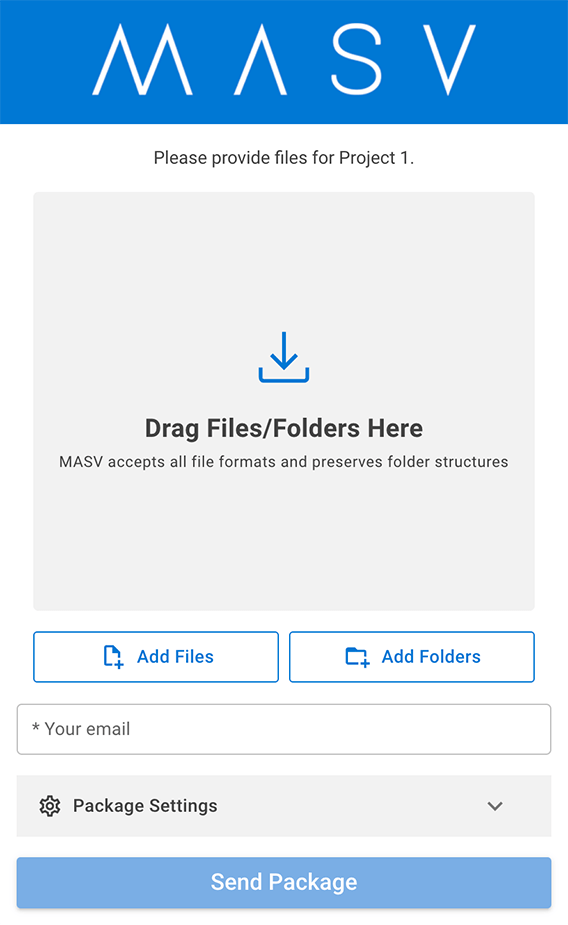
2. Using their web browser, the email recipient can drag and drop the files onto the Portal page and send the files as a package.
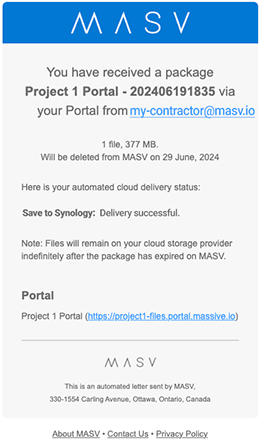
4. As the Portal owner, in addition to a package notification email, you’ll receive an email notification when the files have been delivered to your Synology storage.
💡 Tip: Monitor all sent or received packages efficiently using the MASV Web App. Navigate to historial de transferencias, access the Received tab to view a detailed delivery log of received packages. From here, you can also send active packages to your Integrations like Synology by selecting the package, choosing Send Package to Cloud, and confirming your desired Integration.
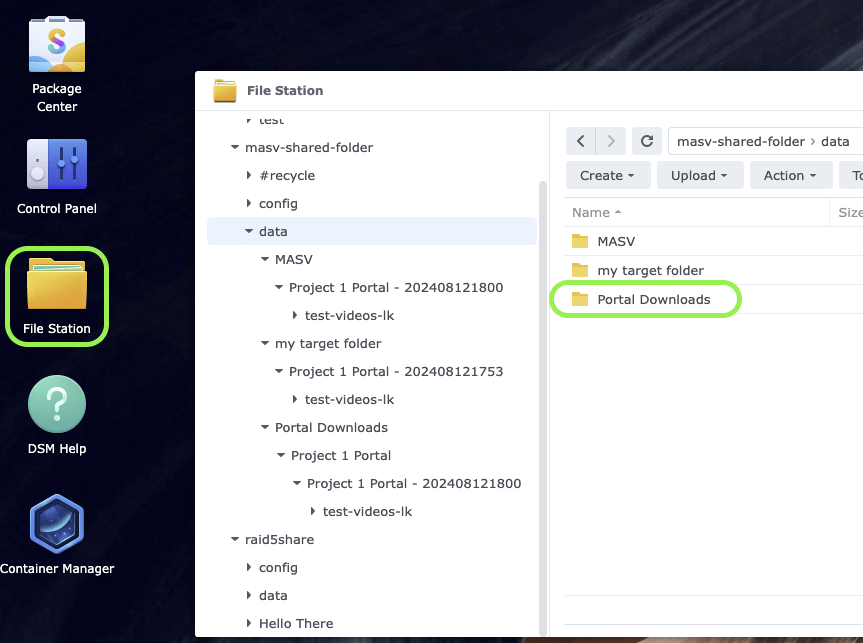
5. On your Synology device, open File Station, and navigate to your mapped folder. If you didn’t set an optional Target Directory, your files are saved to the following default location: Portal Downloads > [Portal name] > [Package name].
Congratulations! You’ve installed the MASV Agent, set up an Integration in the Aplicación web MASV, and delivered files to your Synology storage by using a MASV Portal. You can create as many Integrations and MASV Portals as you need to help organize your file transfers, teams, and projects.
Next Steps
There are so many ways our customers build MASV into their workflows, including using the Aplicación de escritorio MASV to set up upload and download automations. You can also build custom workflows by tapping into the MASV API. For more information about the MASV API, visit our Documentación para desarrolladores de MASV.
Try the MASV Integration with Synology NAS
Use MASV and Synology storage to speed up content ingest to storage workflows.