Adobe Premiere Pro and DaVinci Resolve are fantastic platforms to cut and color video footage. They both offer editing and coloring tools but it’s common for video professionals to switch between the two platforms. Many editors will edit in Premiere because it’s been around forever and is easier to use — and colorists prefer DaVinci because offers more detailed options to manipulate color.
As such, editors and colorists will share data and media files between each other to get the best of both worlds. And luckily, going back and forth between these two programs is actually quite easy. The key is in a few video file formats known as EDL, XML, and AAF files.
Let’s get into these file types, what they do, and how to set up a Premiere to DaVinci roundtrip workflow! 👇
Table of Contents
Fast, Secure File Transfer for Media Workflows
Keep your post-production running smoothly with MASV, the best way to send and receive large media files.
What are EDL, XML, and AAF files?
EDL, XML, and AAF files reference the information and structure in your editing timeline such as your source media, in and out points, edits/cuts, duration, transitions, markers, etc. These files are used to rebuild your exact cut in another software.
Because EDL, XML, and AAF files are used throughout the post-production cycle — not only for color — it’s important to understand how to export them in general, not just if you’re going to be using Premiere Pro and DaVinci Resolve. VFX artists use the same files, for example.
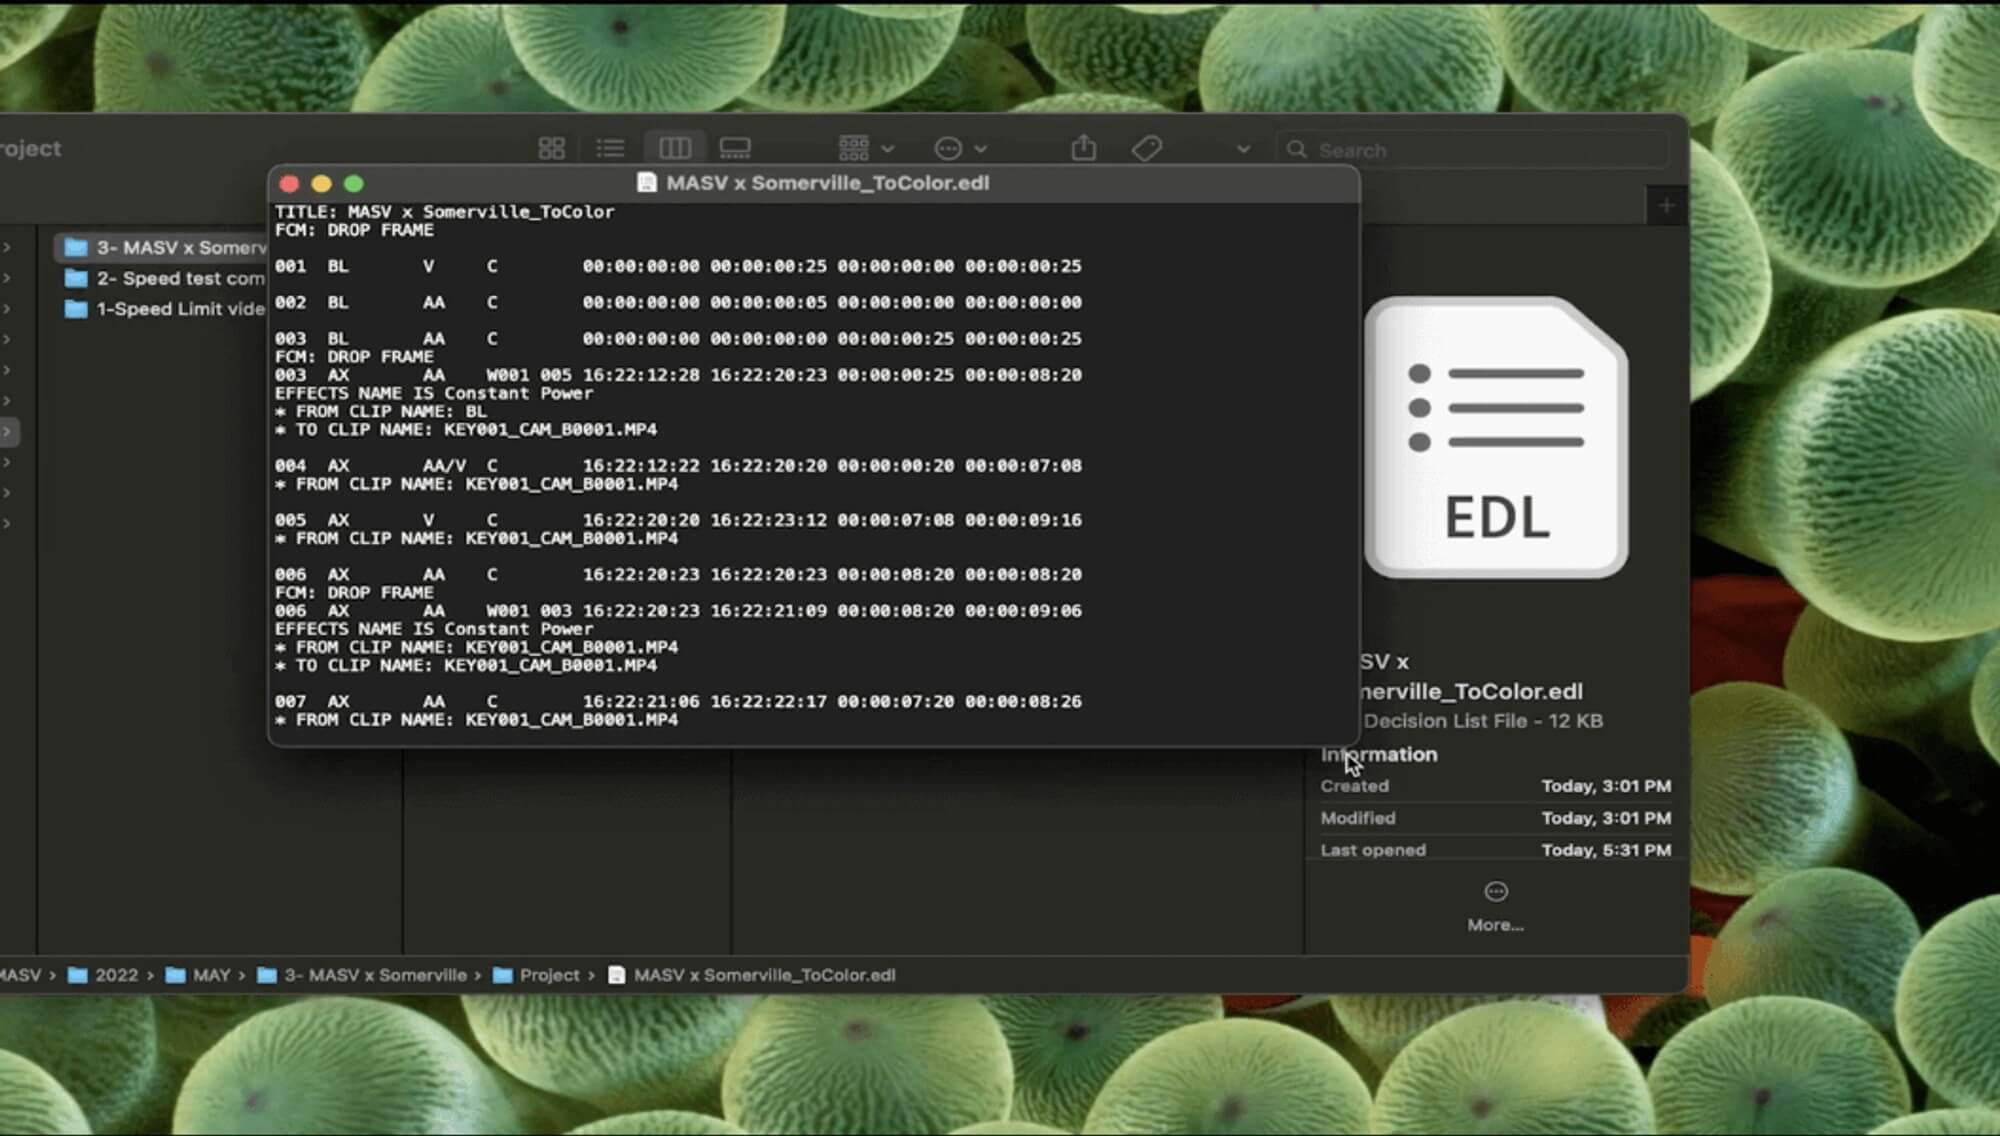
EDL (Edit Decision List)
This is the simplest of the three files. EDLs are plain text files that contain basic information about your edit from a single track of your timeline. It supports one video track and four audio tracks per EDL. This one is best used as a backup reference.
XML (Extensible Markup Language)
XMLs are also plain text files like EDLs but contain way more information, including things like sizings, transitions, time remapping, and other important metadata. XMLs support multiple video tracks, unlike EDL files.
AAF (Advanced Authoring Format)
Last, but definitely not least, AAFs. This one is a multimedia file format and can include video, audio, and other important metadata needed to recreate the exact cut in another software. AAF is the one that includes the most data out of the three and therefore the heaviest.
Sharing Source Media
EDLs and XMLs are just text files, which means they’re very light and can be easily transferred through email. However, you still have to send the source videos and audio files to your teammates so they can re-link the original footage when they work. Obviously, these files will be quite heavy so you can’t send them as email attachments. AAFs are also difficult to transfer using email because they can be up to 2 GB in size.
Luckily, there’s a solution to that. MASV is a super easy, fast, and secure way to transfer source media to make your workflow go even smoother. With a whopping 15 TB file size limit, you can send massive files to anyone, anywhere.
💡 Read More: How to Send Large Video Files
The Easiest Way to Send Large Files
Yes, you can send up to 15 TB in files or folders with MASV!
Benefits of this Premiere to DaVinci workflow
If Premiere Pro is your editing software of choice, this roundtrip workflow gives you the best of both worlds, so to speak.
DaVinci Resolve is a powerful software that offers a multitude of advanced color grading options. In terms of color, it knocks Premiere Pro out of the park. However, many video professionals prefer using Premiere Pro for editing as it was built as an NLE first, whereas DaVinci is a color grading tool first, and an NLE second.
It’s also useful if you’re not doing the color grading yourself. There are editors that understand color theory and are able to grade footage but don’t specialize in it. In many cases, passing the work off to a colorist is required, which is where this workflow would come in handy. Colorists also have specialty monitors and equipment to grade.
Steps in the Premiere Pro to DaVinci Resolve Workflow
1. Prepare your timeline
Before we export anything, let’s prepare your edit.
- In Premiere, make a copy of the sequence. Ideally, you want to keep it to no more than two video tracks (if possible.)
- In the copied sequence, remove any color, effects, or essential graphics/ texts. You can remove the audio as well if it’s for color grading. Keep it clean and simple.
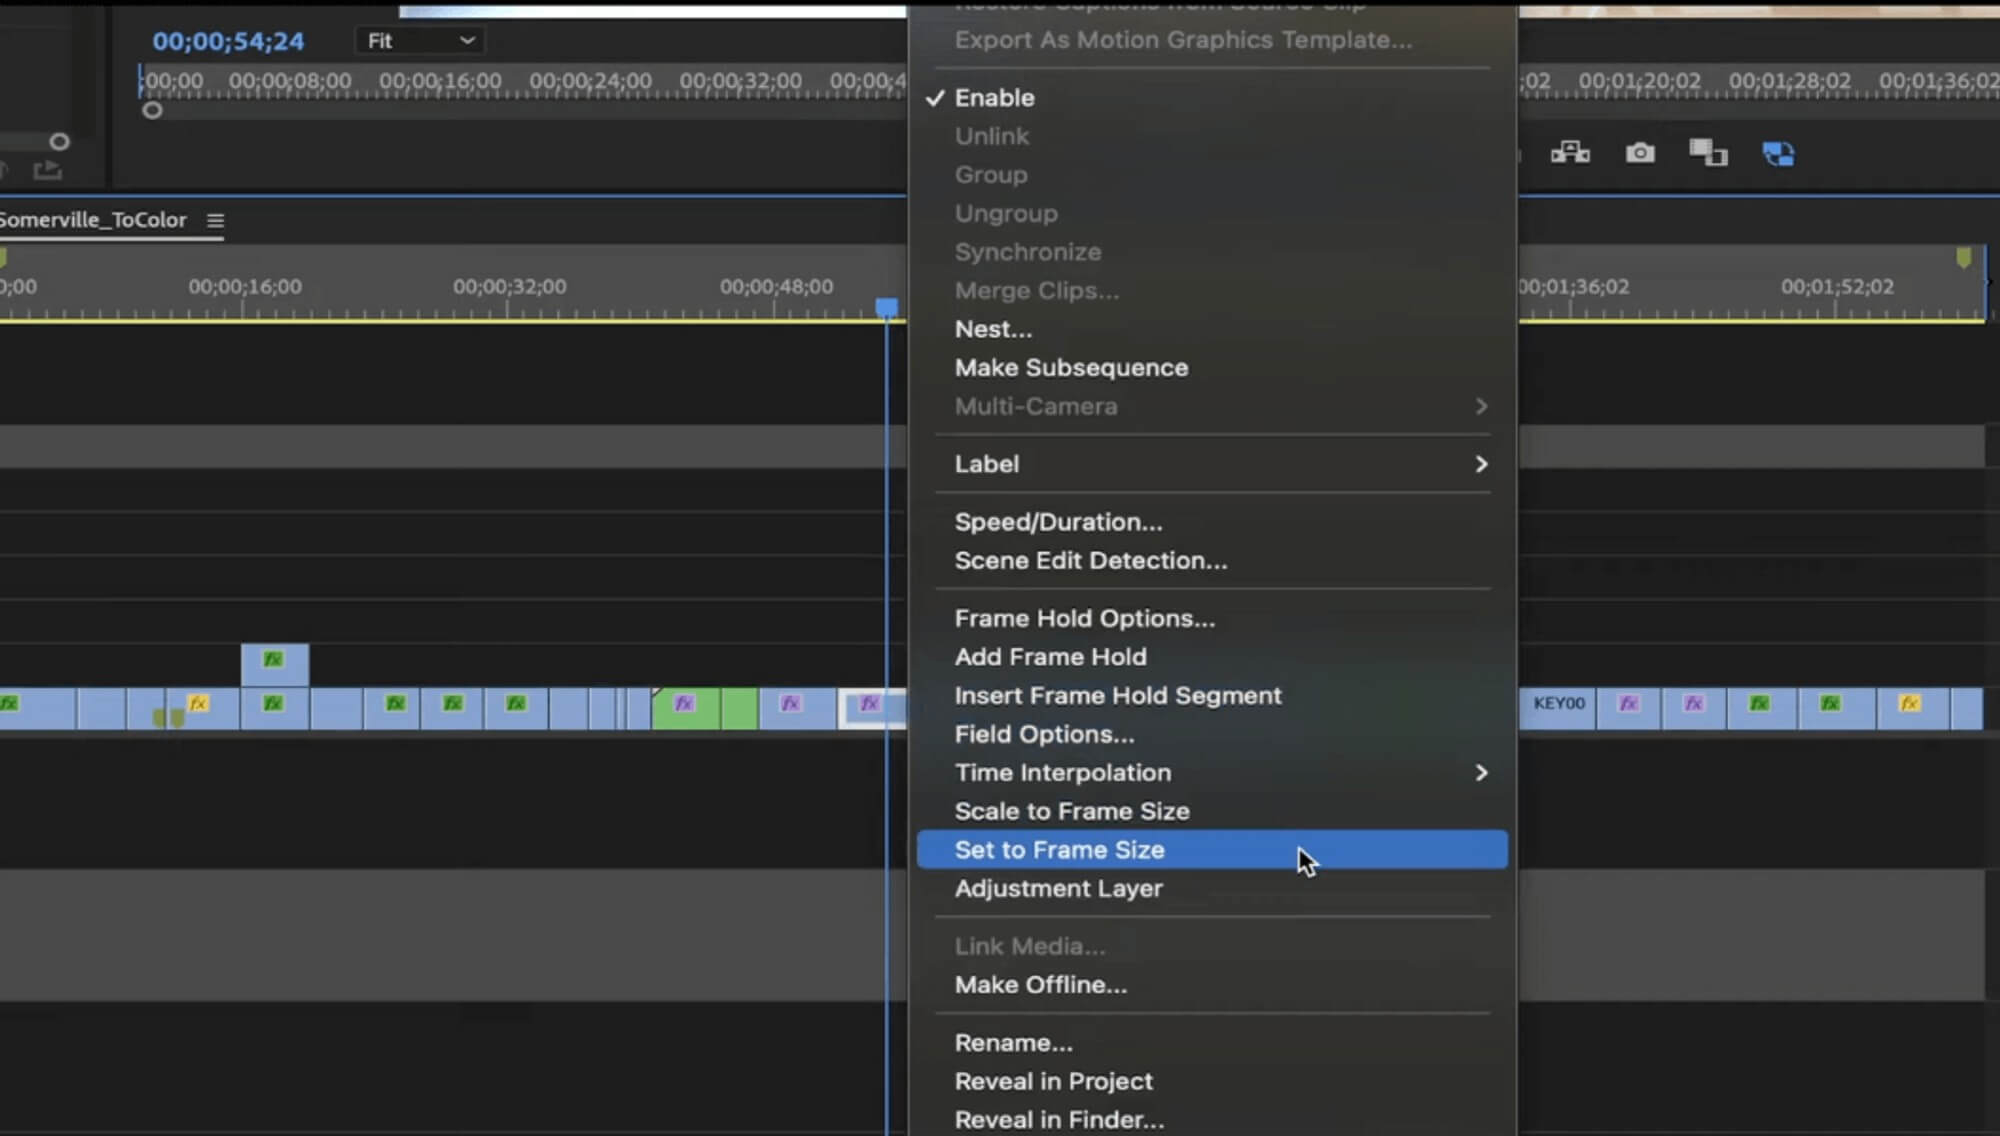
- Right-click your scaled footage and click Set to Frame Size, not Scale to Frame Size, so it can translate accurately.
4. Speed changes might not be read well, so if you have this or something special done to any of your clips, with plugins for example, just export a high res version of it and replace that part..
💡 Learn More: How to Share a Premiere Pro Project and Source Footage
2. Export EDLs, XMLs, and AAFs from Premiere Pro
Now that you’ve prepared your edit, you’re ready to export your file from Premiere Pro.
Export EDL FILE
- Go to File > Export > EDL.
- In the popup window, you can select the parameters that you want to include.
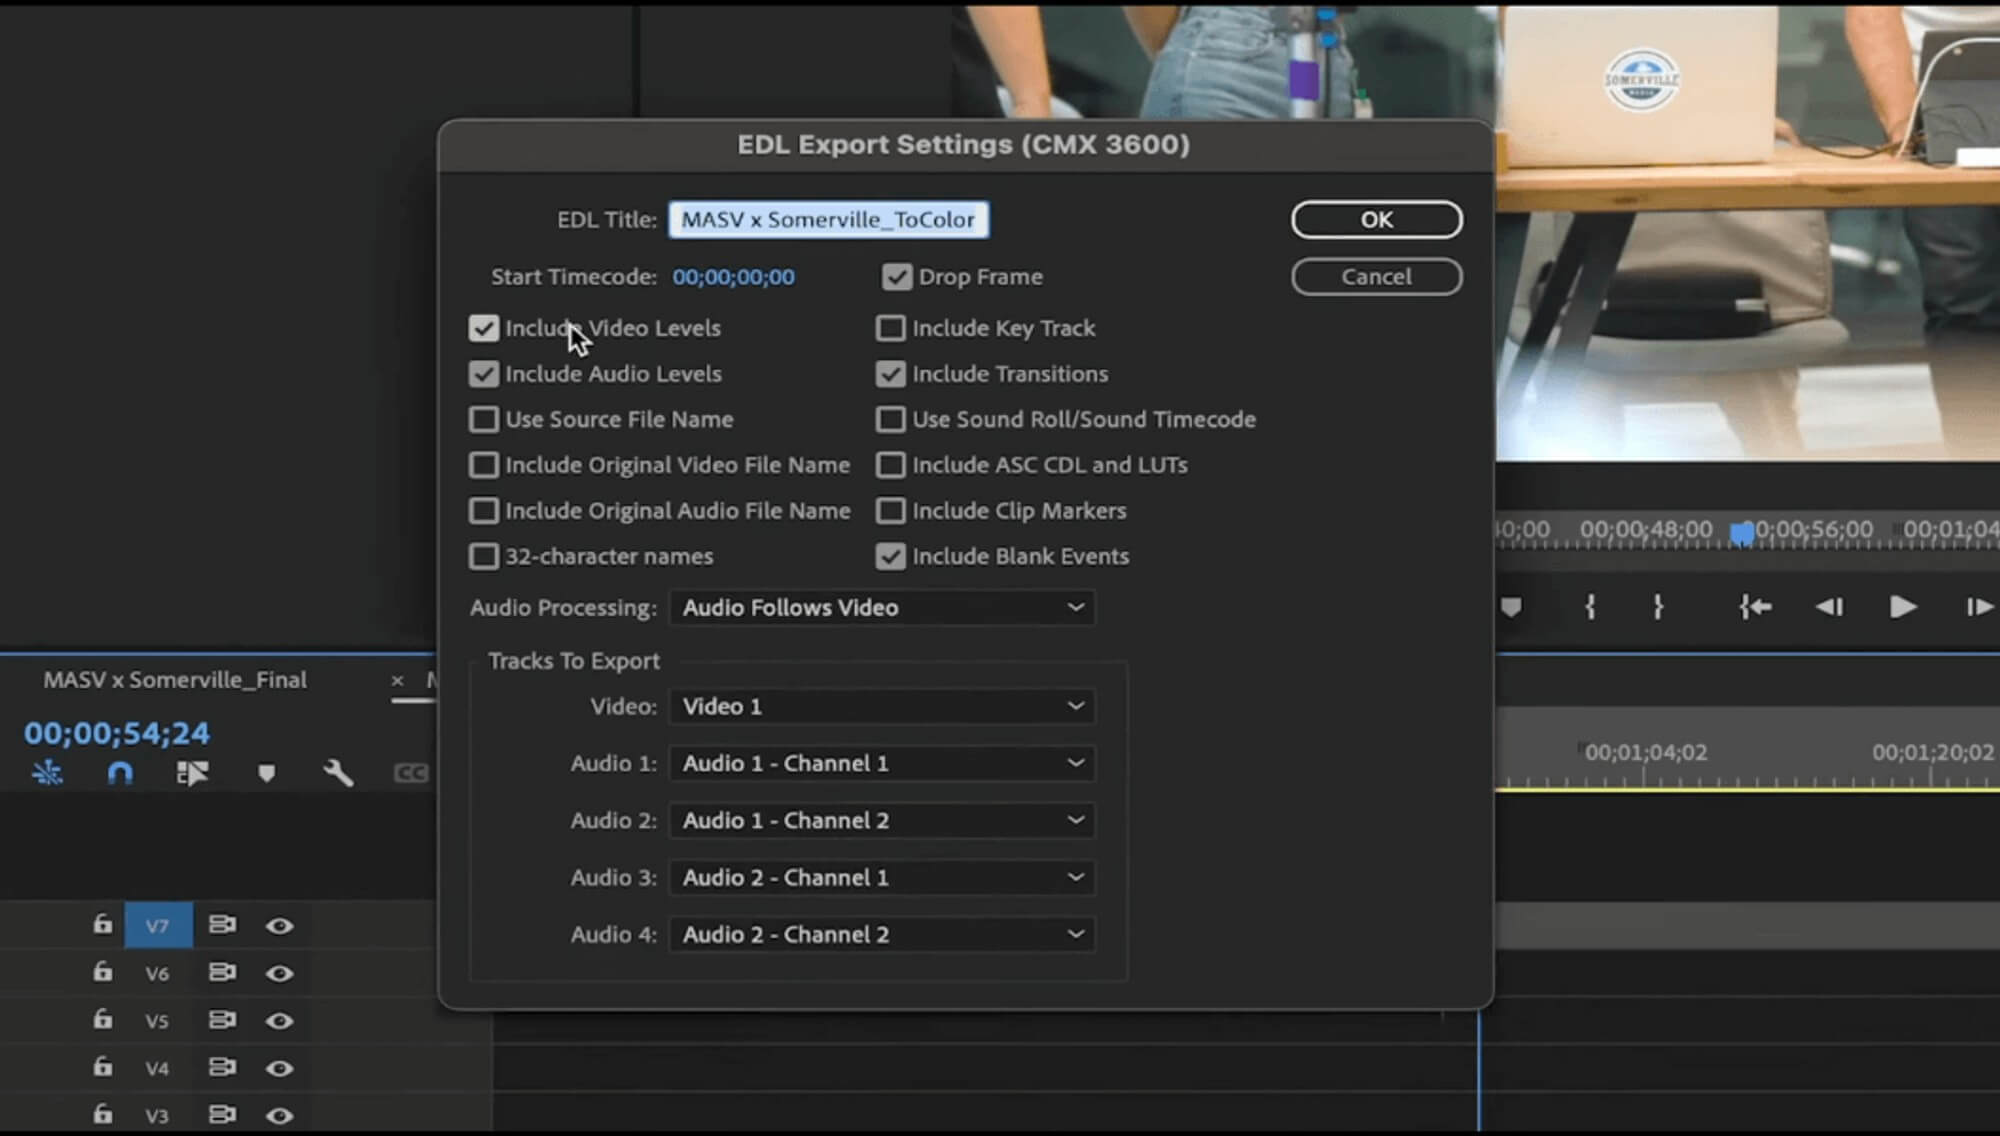
3. Select the video track you want to export in this EDL and click Ok.
4. Select the location where the file will go.
If you want the other video track you will have to export it separately.
Export XML File
- Go to File > Export > Final Cut Pro XML.
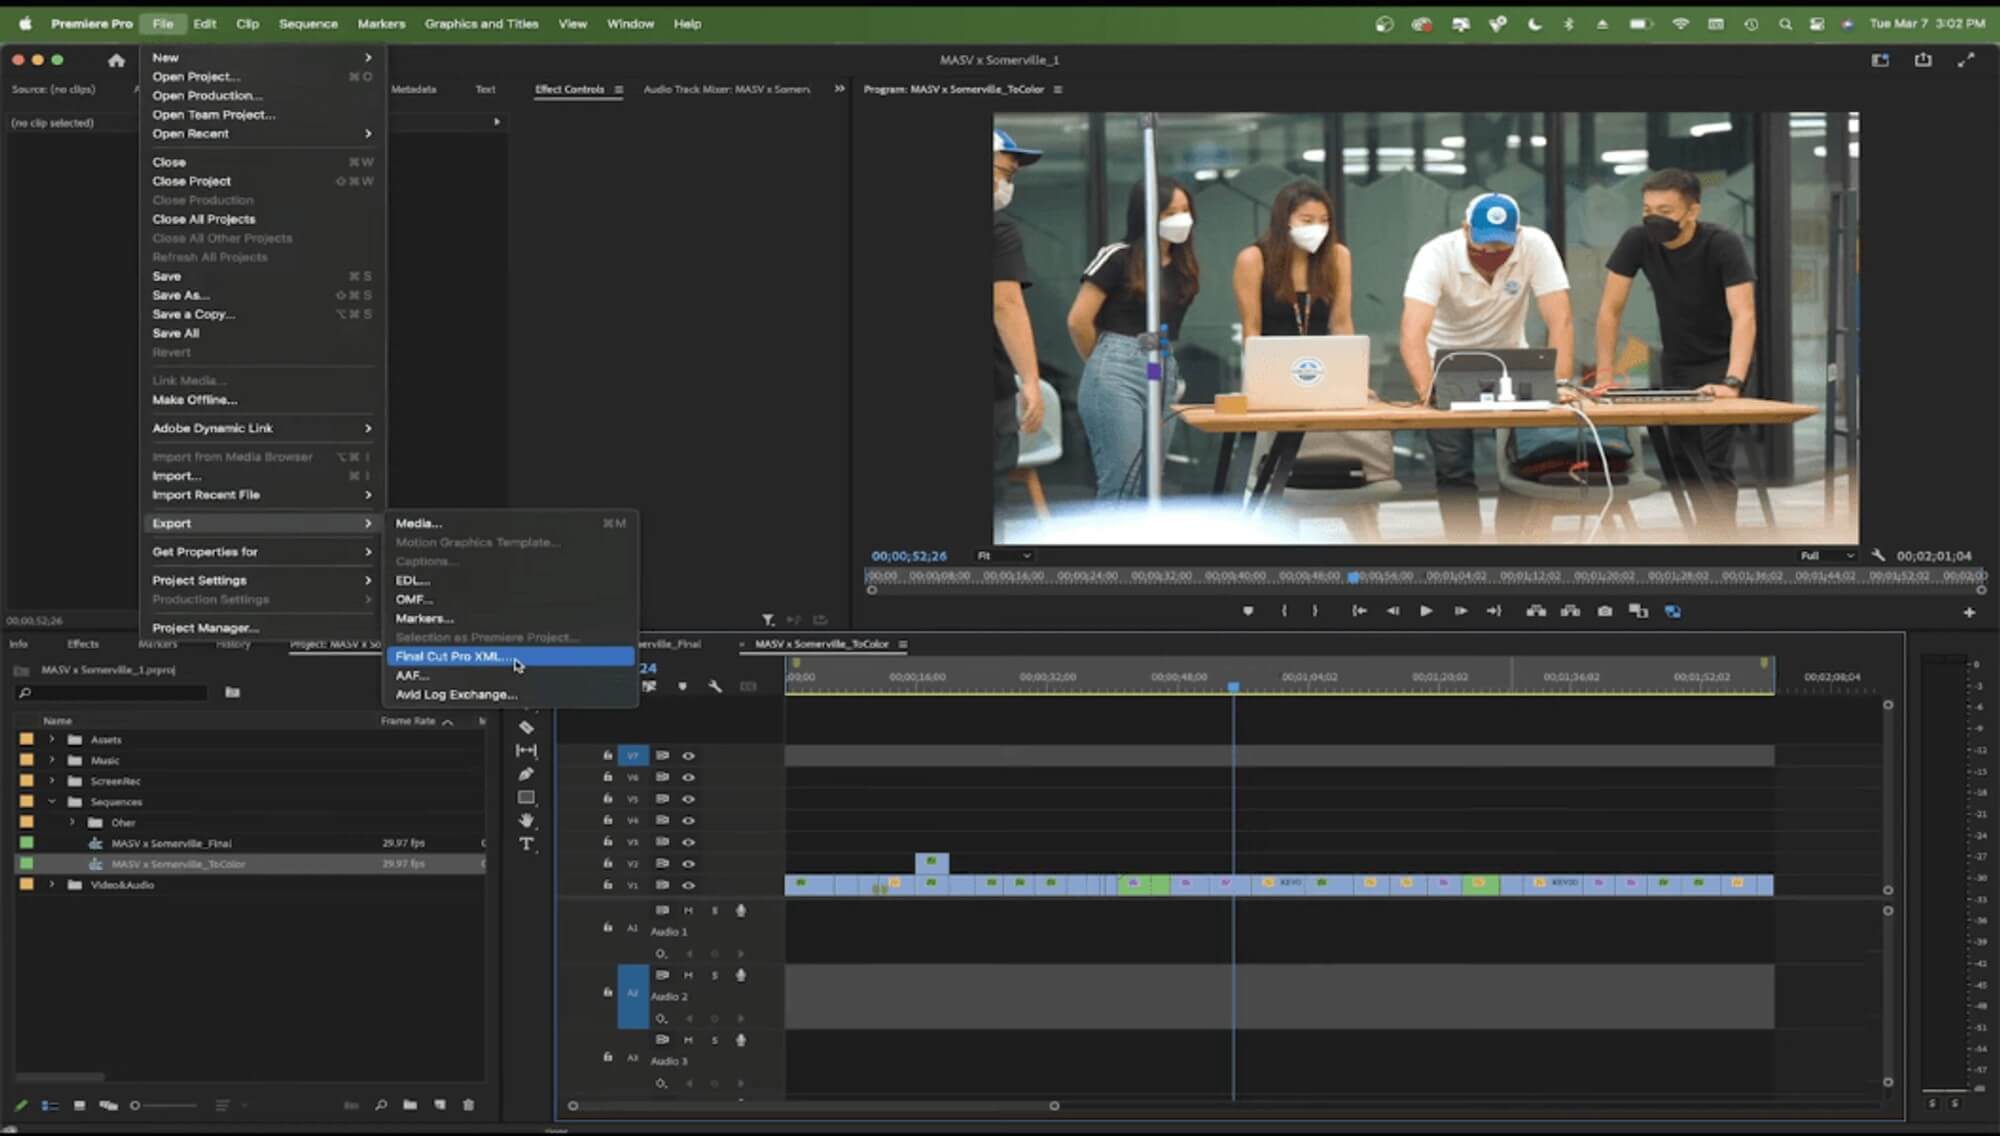
2. Select your location, and that’s it!
Note: If there’s an issue with the export, you will receive a report in a popup window that explains why.
Export AAF File
- Go to File > Export > AAF.
- In the popup window, check Mixdown video if you want to merge the whole video to be a single clip included next to the AAF. If you leave it unchecked, it will link to each of the existing video files as separate clips.
- Click Ok.
- Choose the location and there you go!
Need to Send Large Premiere Pro Files?
You’ll love how easy it is to use MASV to send Premiere projects, source media, and bin items.
3. Import EDL, XML, and AAF files into DaVinci Resolve
Now that we have our files, let’s open them up in DaVinci.
- Create a new project.
- Give it the same name as your main Premiere project.
- Click on the Settings icon in the bottom right corner.
- Click Image Scaling on the left-hand side (under Master Settings).
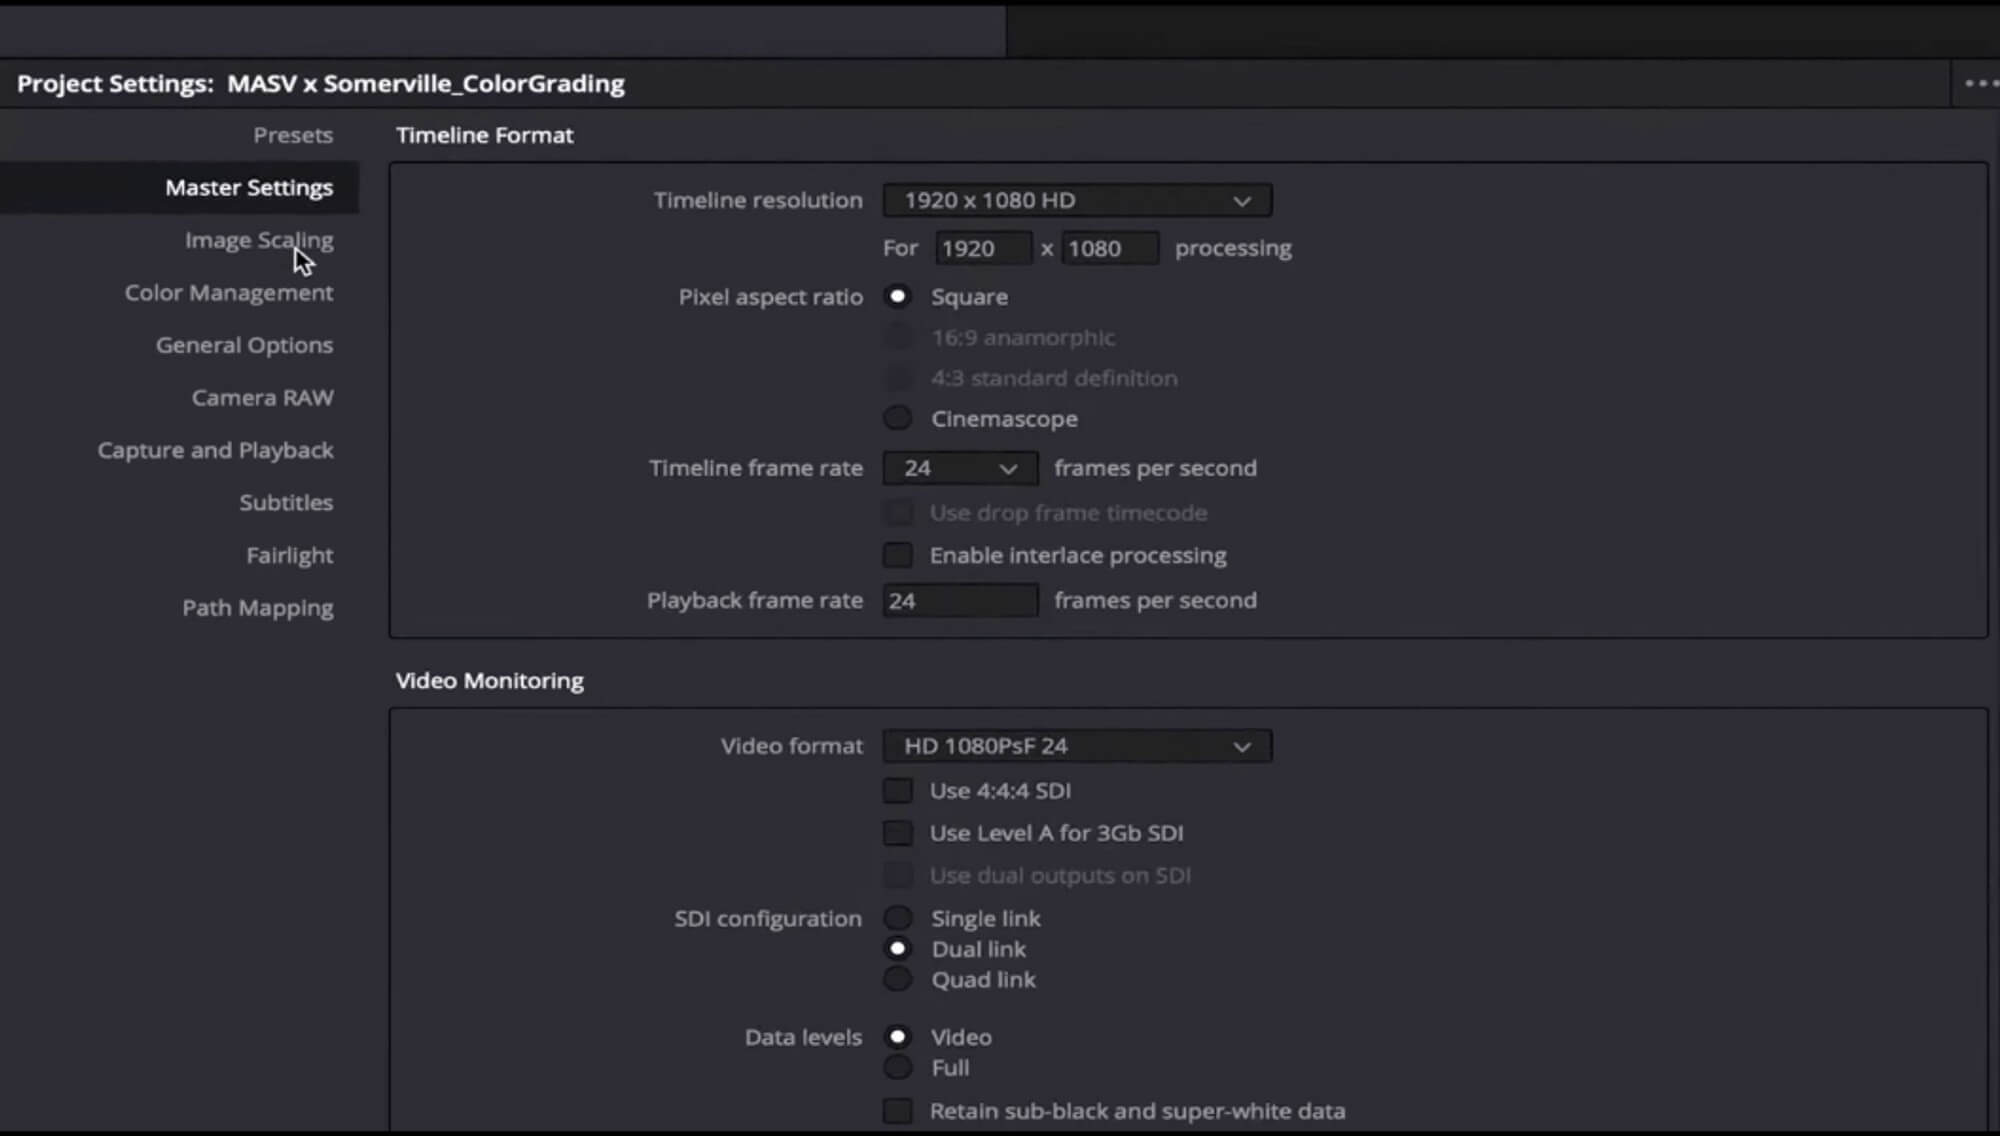
5. Go to the section Input Scaling.
6. Choose Center crop with no resizing from the dropdown menu. This will help to keep the right resized footage from Premiere Pro.
7. Click Save.
8. Go to File > Import > Timeline. From here you can import the EDL, XML, or AAF files.
9. In the popup window, make sure to change the name of the DaVinci Resolve timeline.
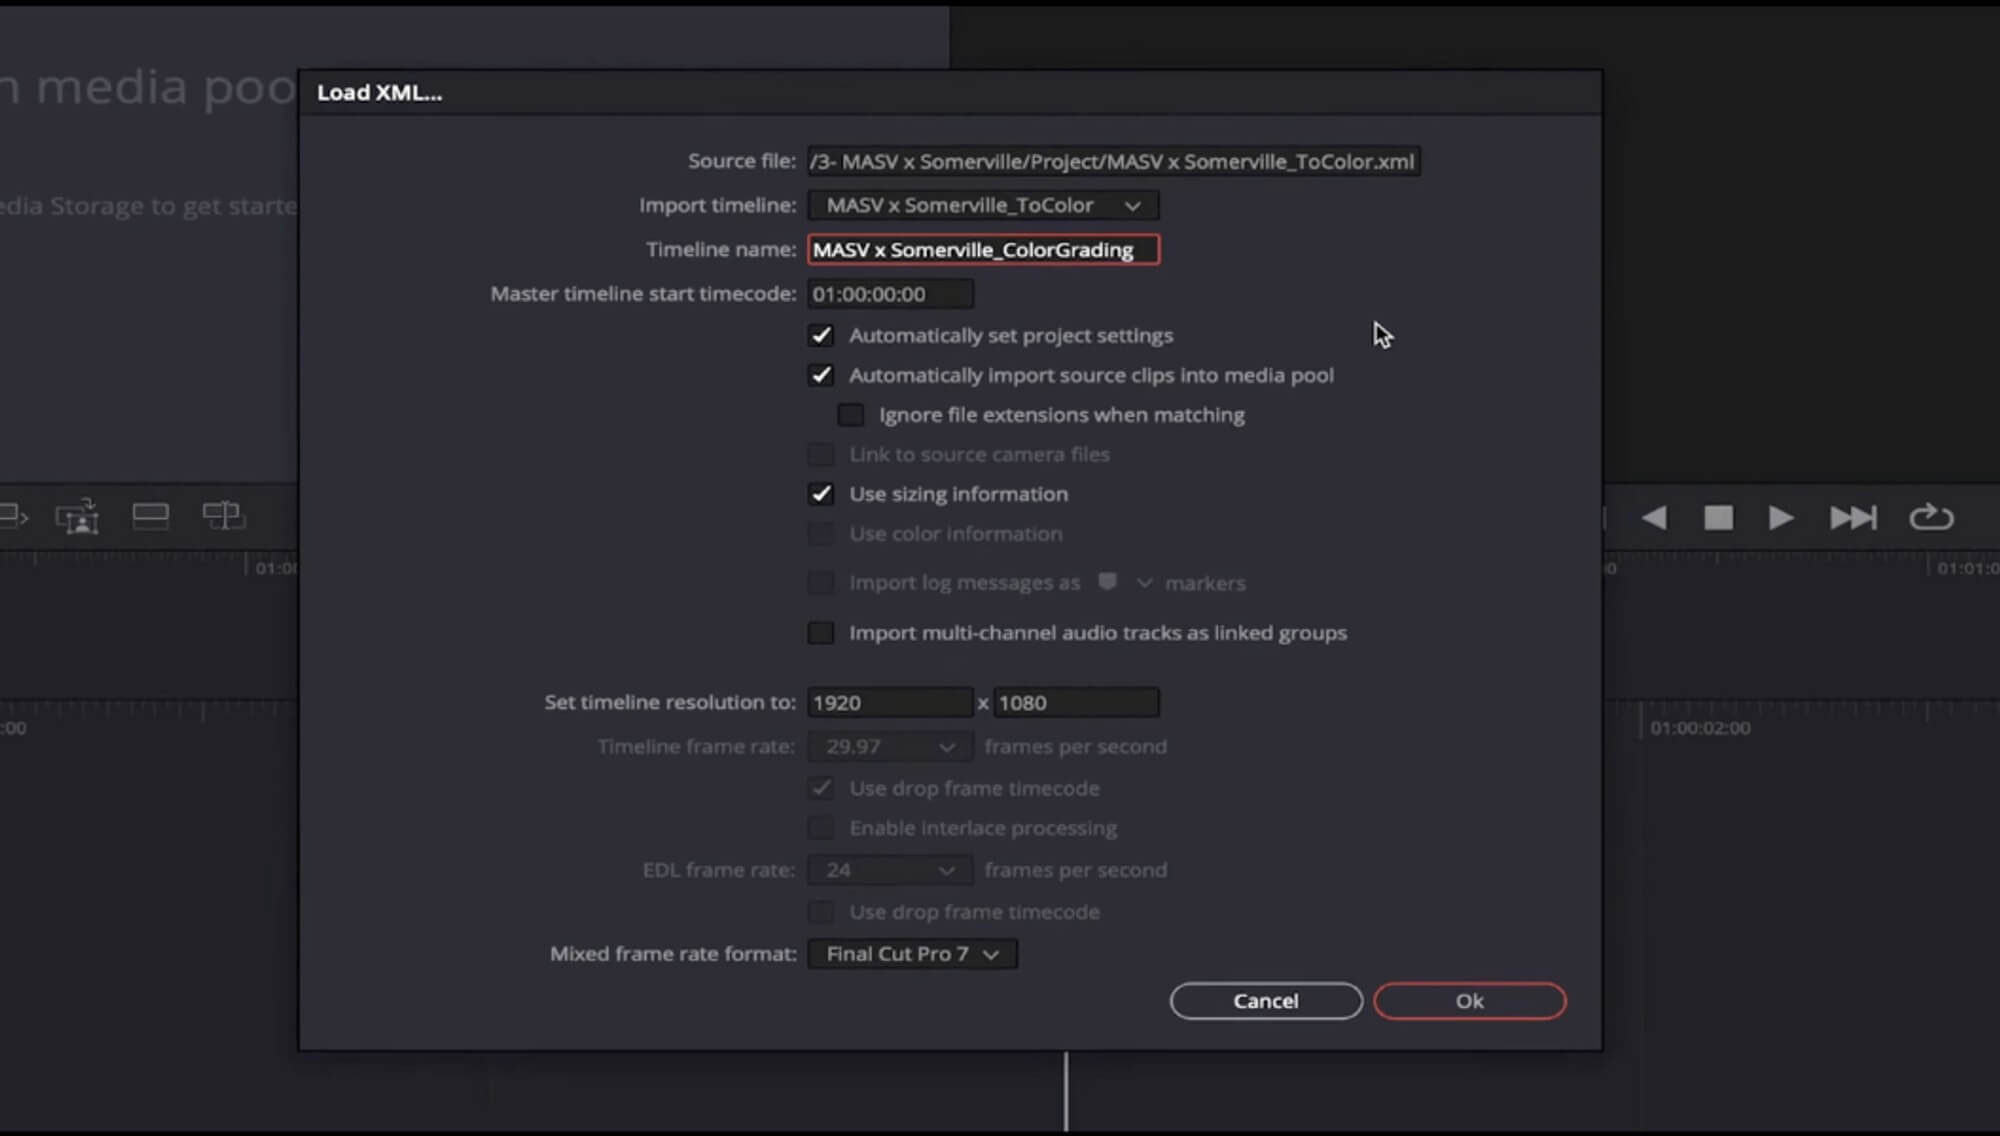
10 Check the option Automatically set project settings.
11. Click Ok.
Now you can see your Premiere timeline in DaVinci Resolve:
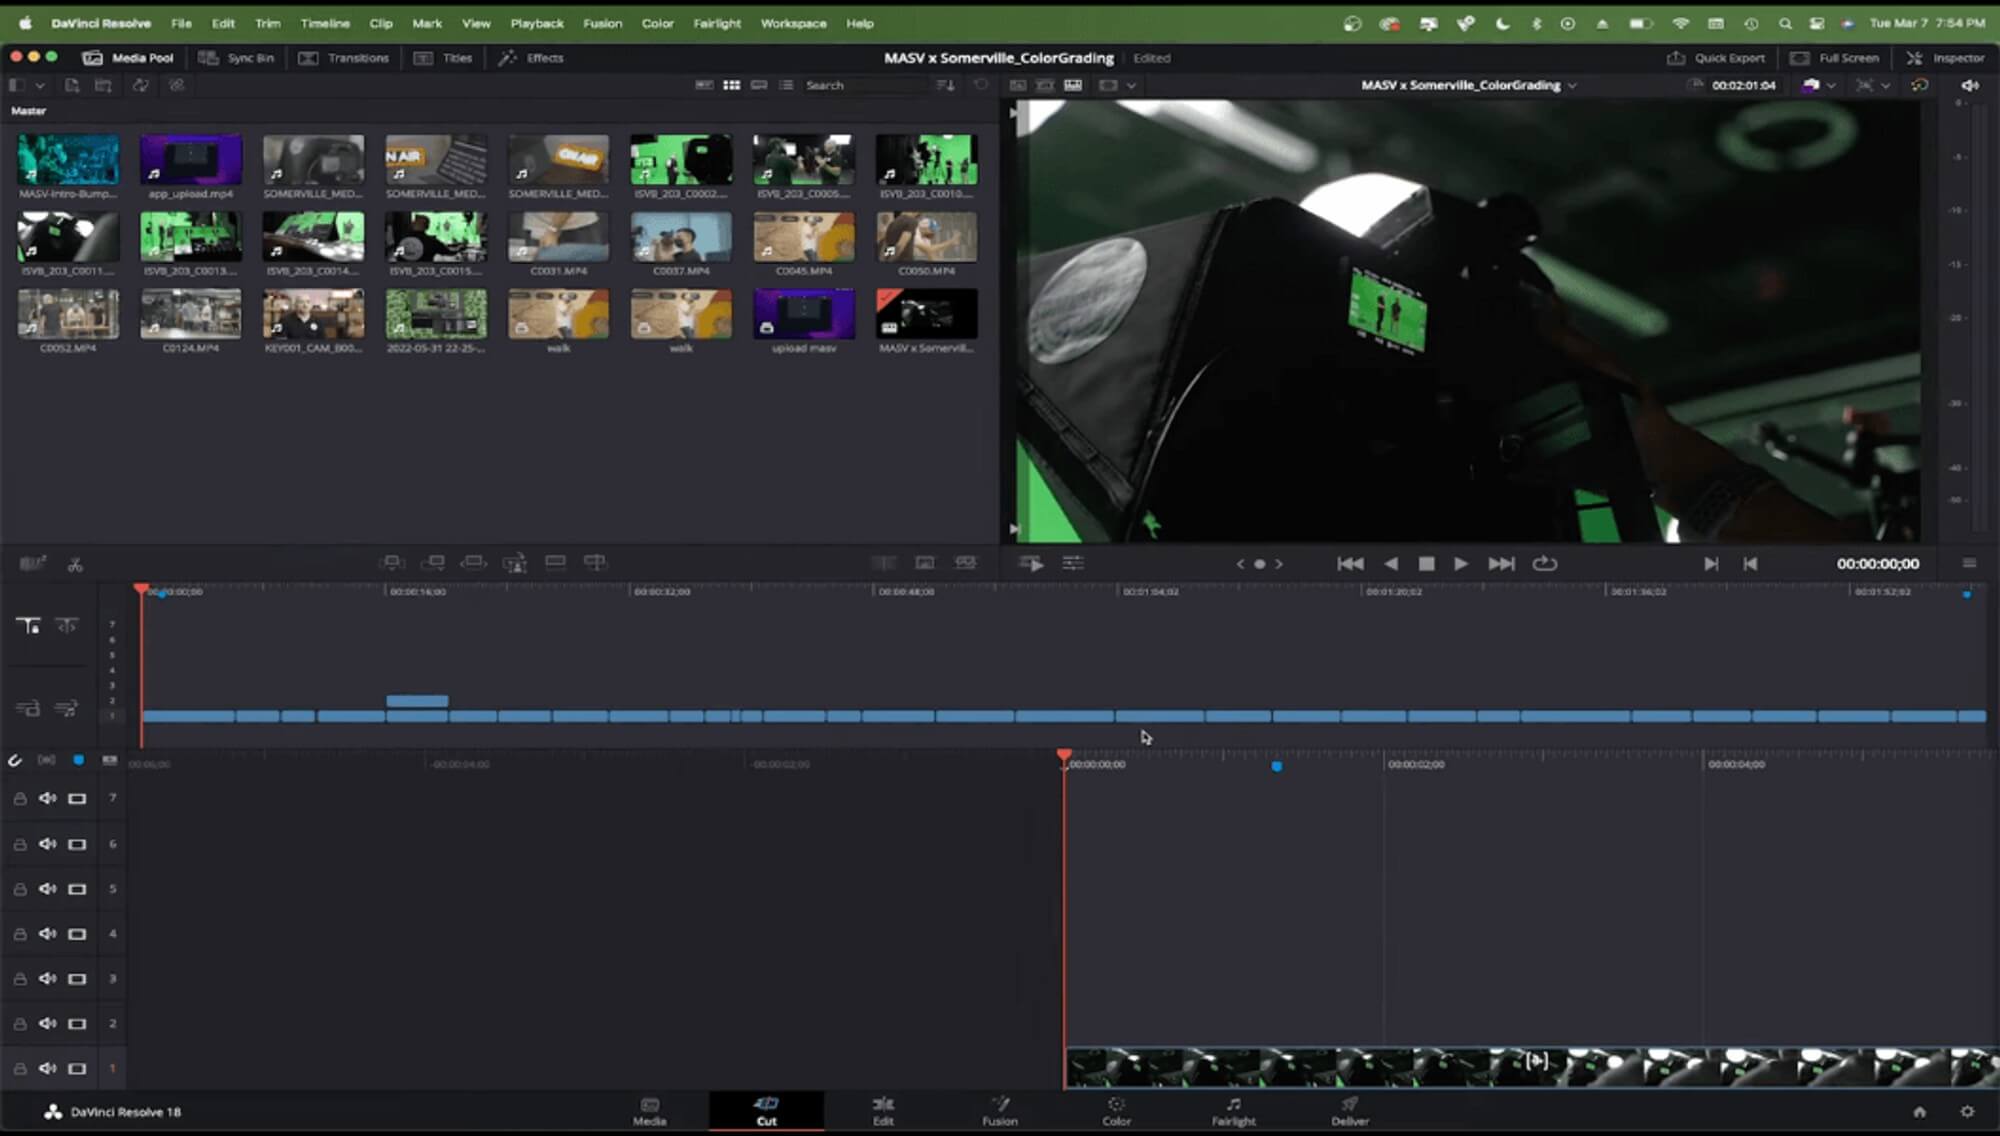
11. You can also export reference .mov from Premiere Pro and import it to DaVinci so you can make sure everything is in order.
12. If everything looks good, you can do the color grading. Click the Color tab at the bottom of the program.
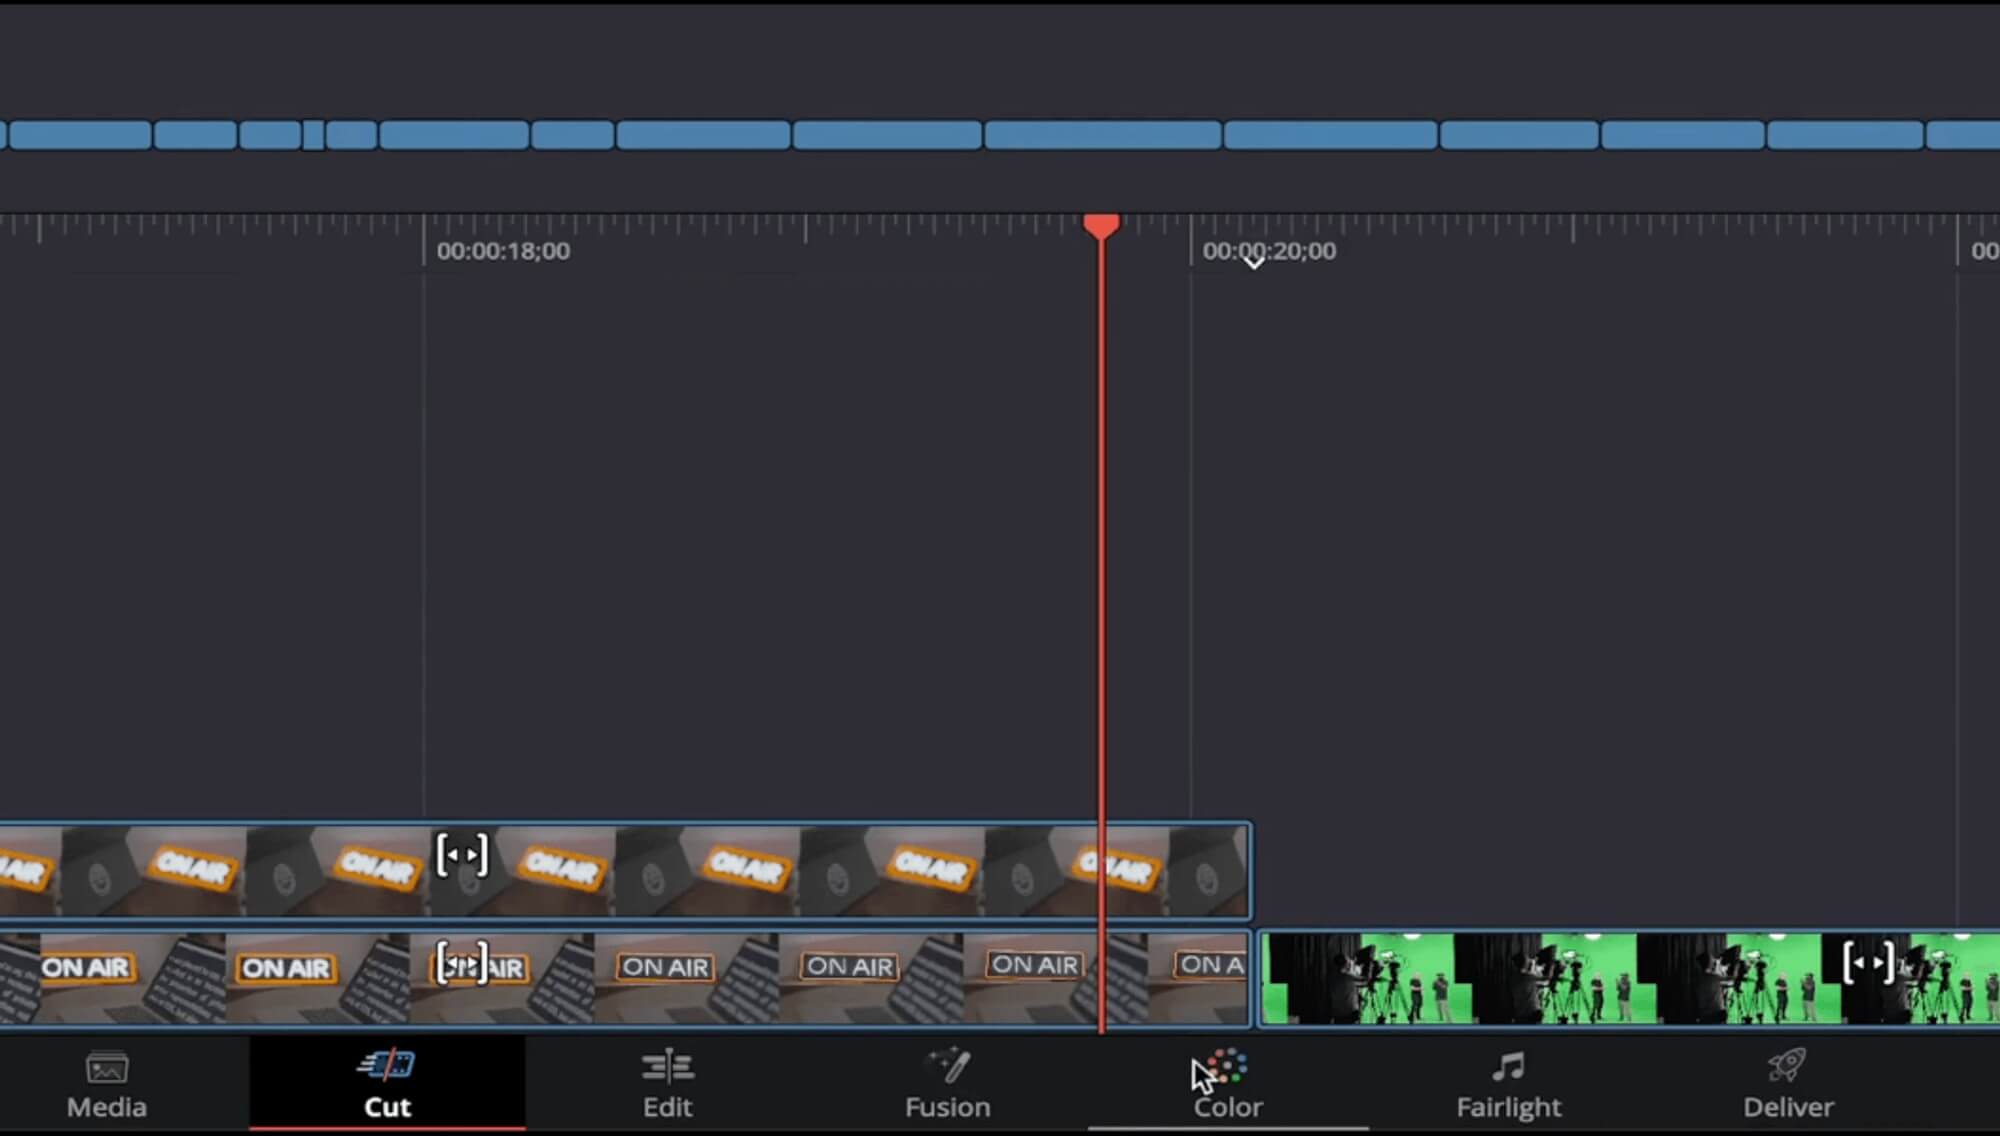
13. Color grade your video.
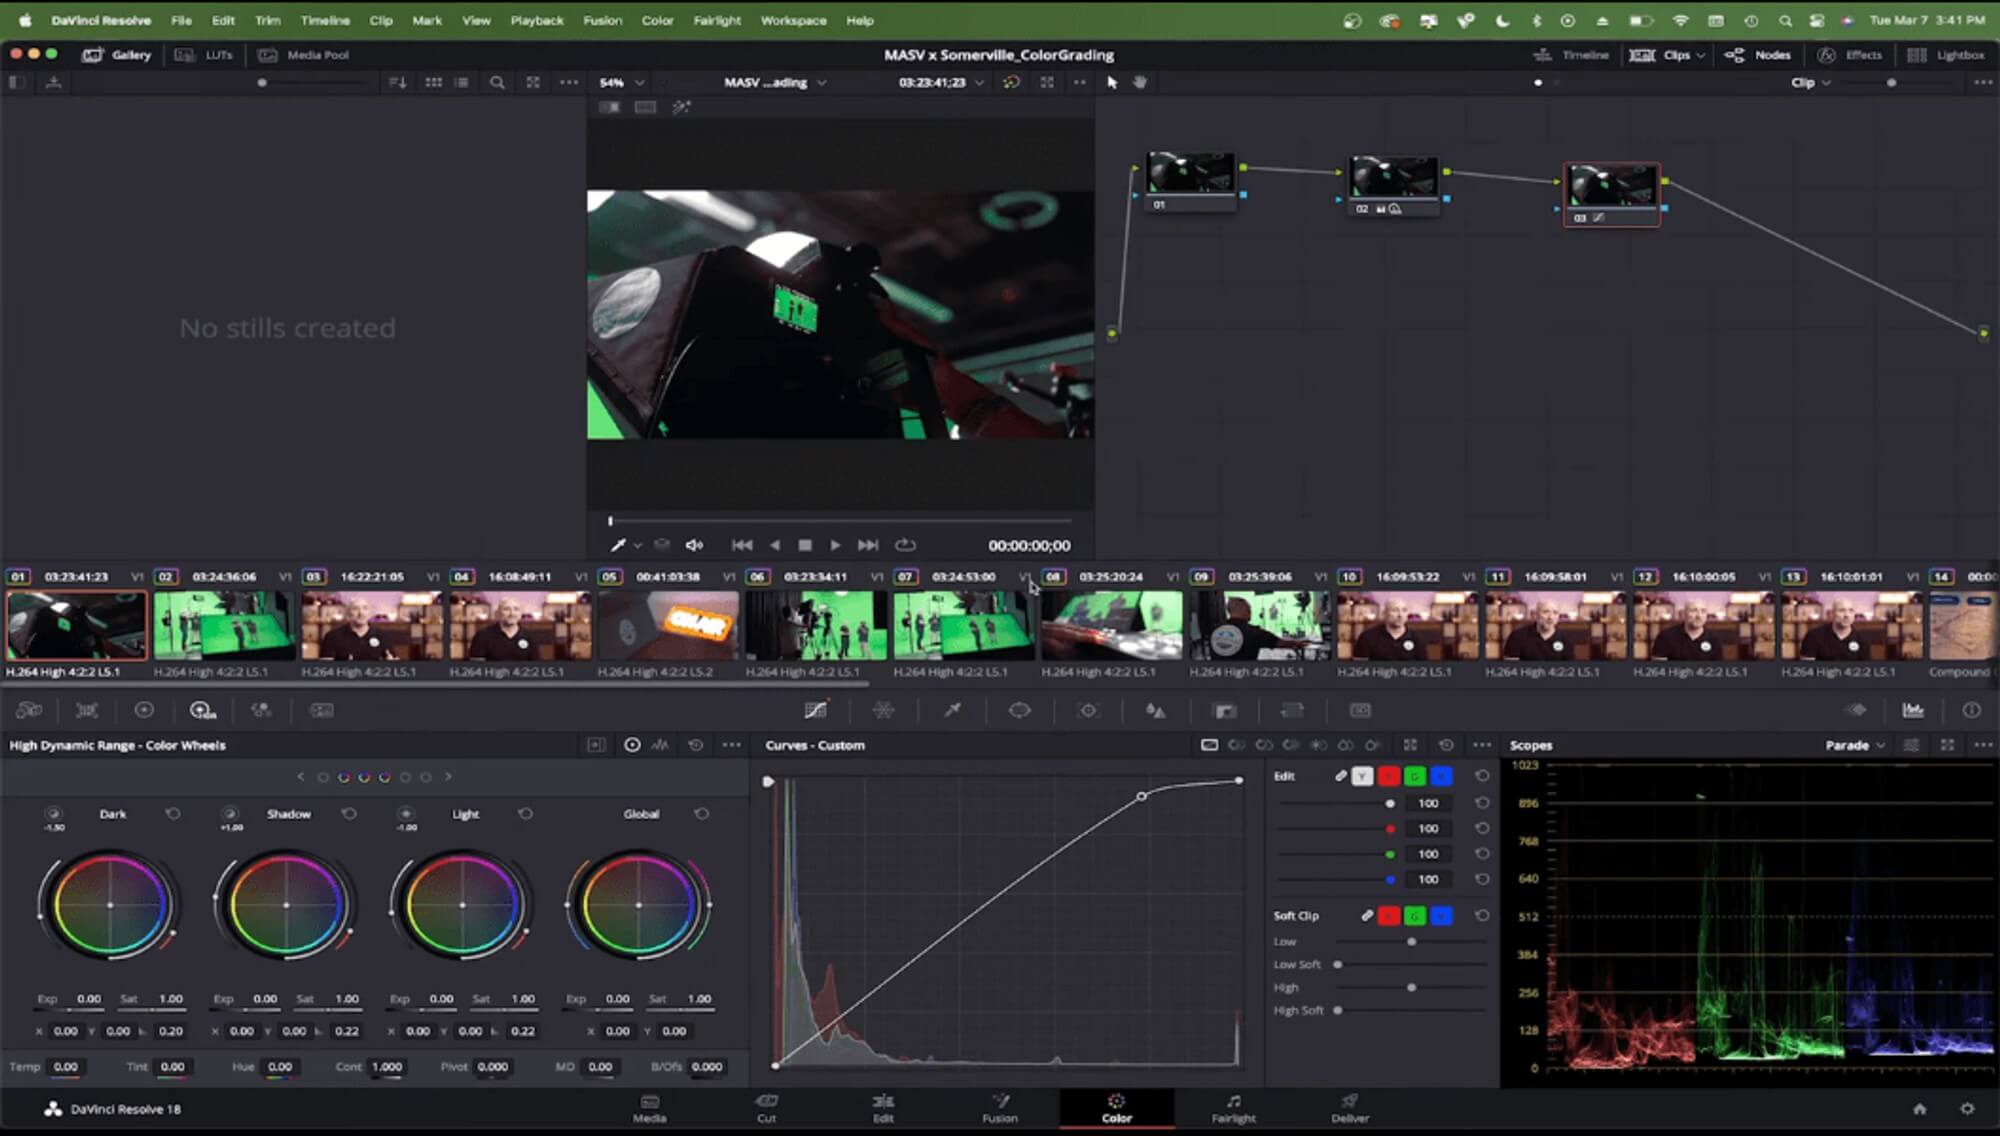
Once you’re done, you’re ready to export your files from DaVinci Resolve.
Simplify the Color Grading Workflow
Professional colorists trust MASV to send and receive large files quickly and securely.
4. Export EDL, XML, and AAF files from DaVinci Resolve
Export EDL file
- Go to File > Export > Timeline.
- Click the dropdown menu in the popup window and select EDL files.
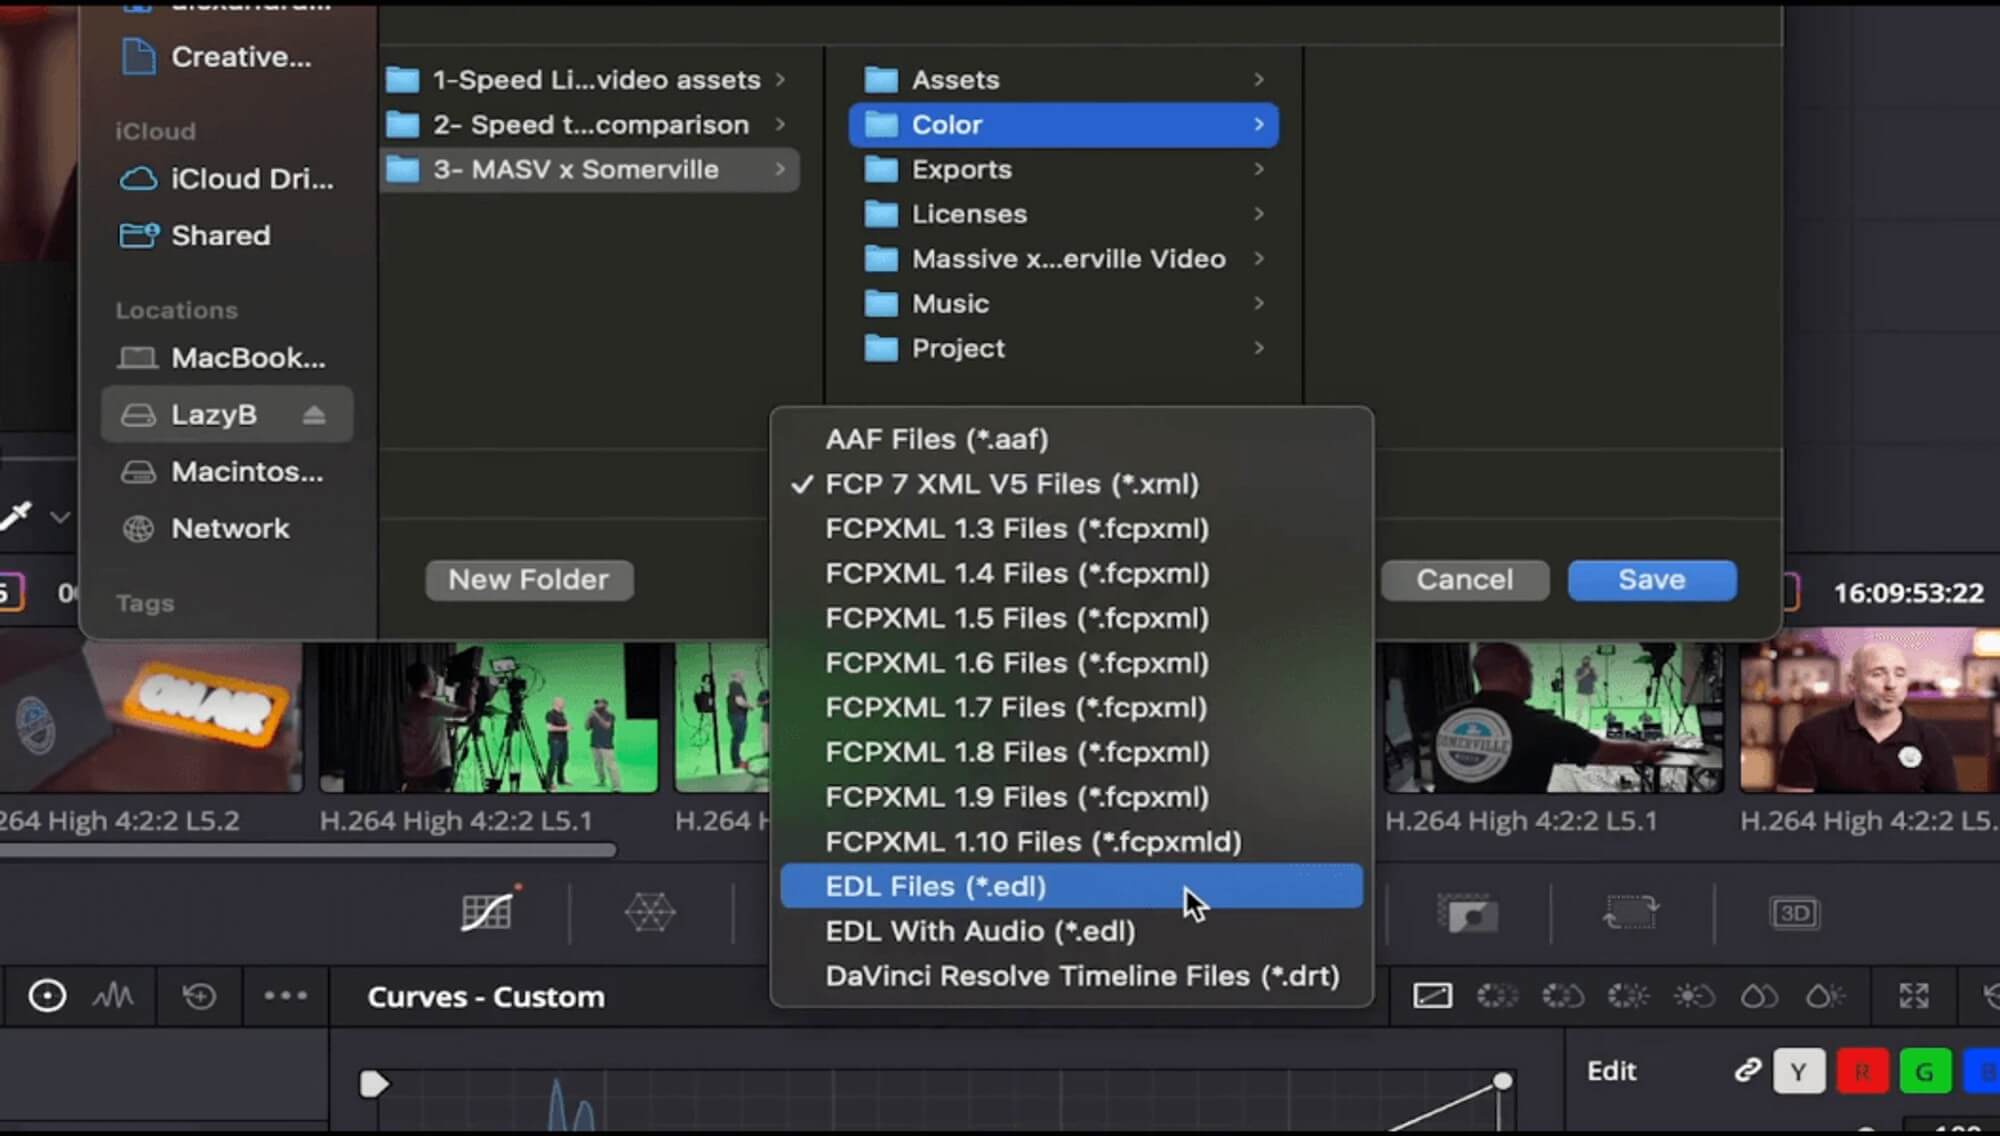
3. Click Save.
Export XML file
- Go to the Deliver tab at the bottom of the screen.
- In Render Settings, scroll to the right and click Premiere XML.
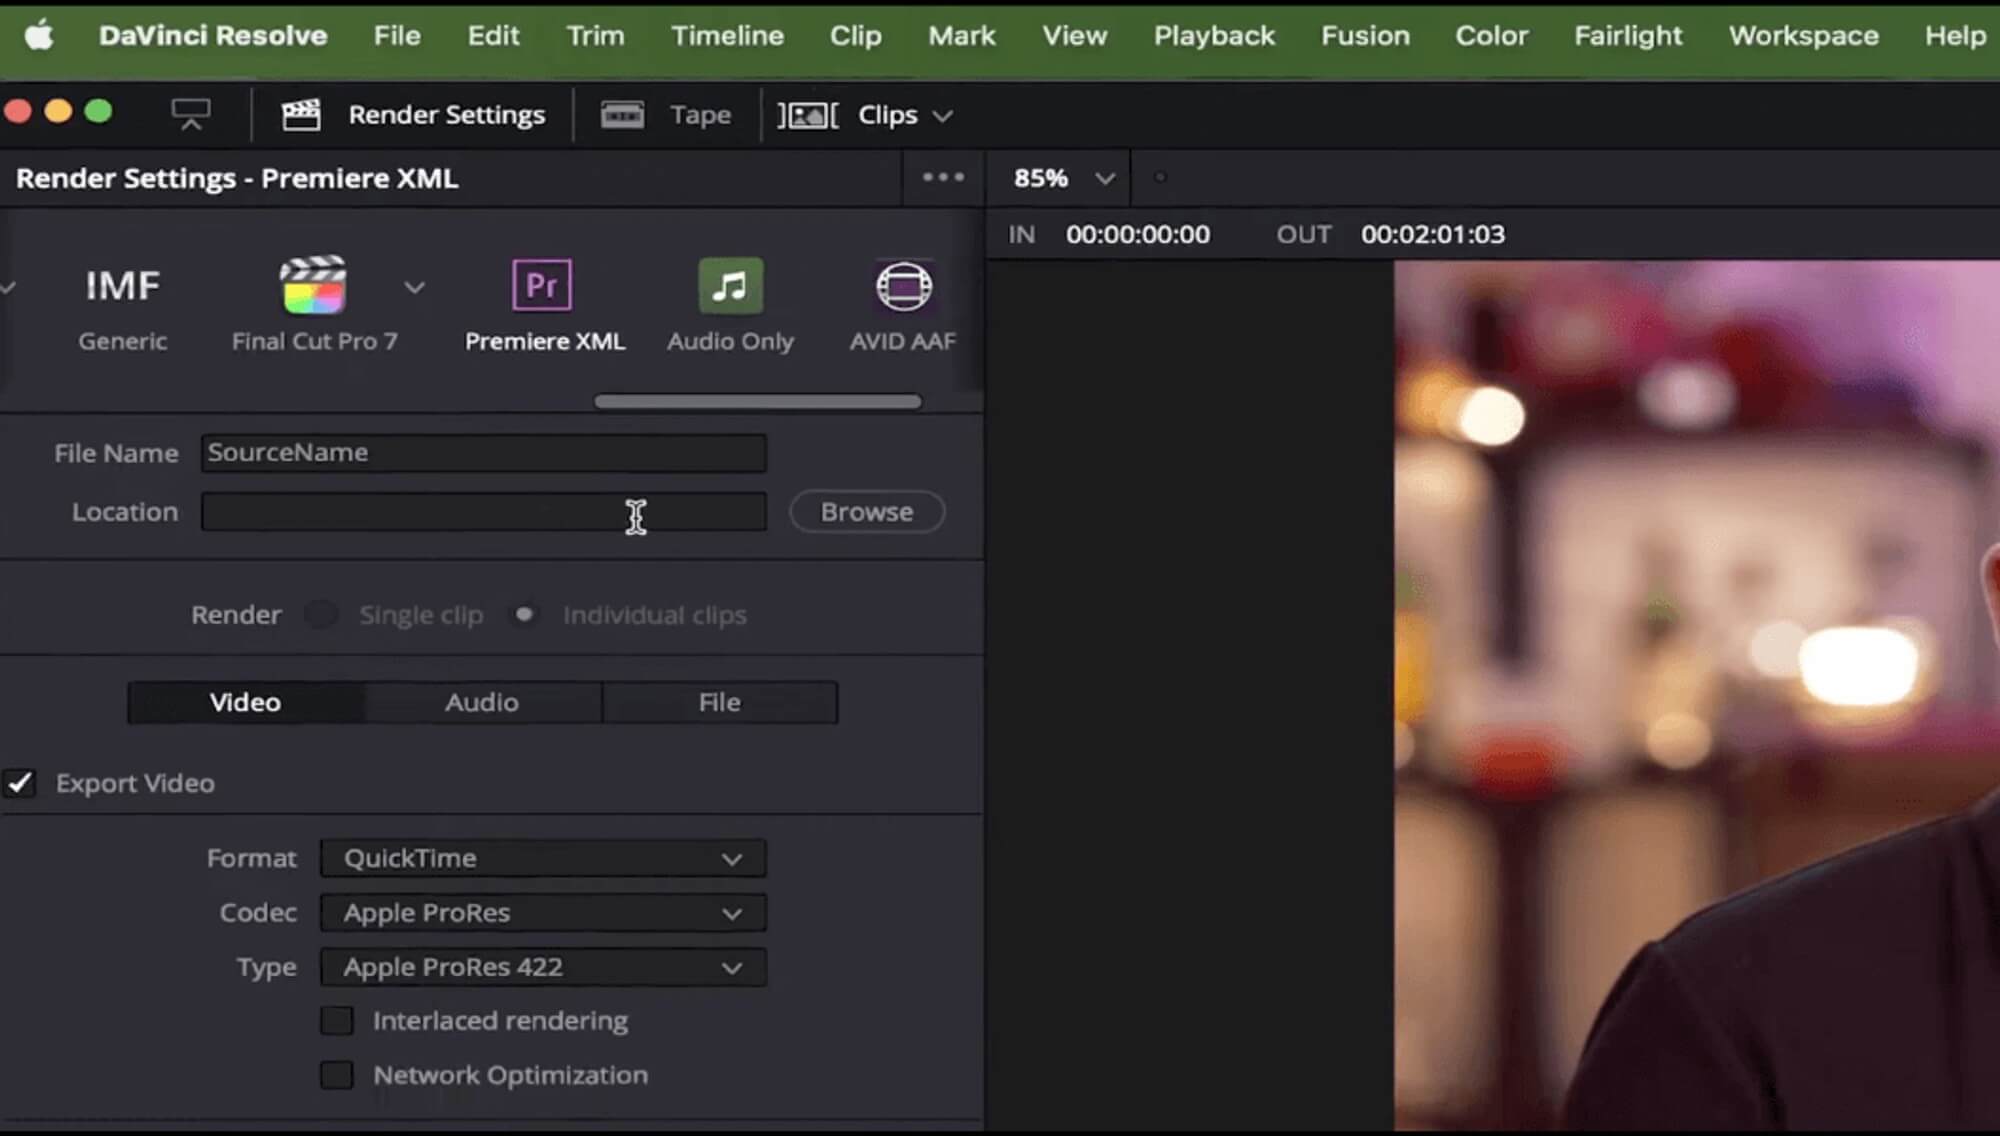
3. Click the Browse button next to Location.
4. Select a location.
5. Click Open.
6. Click the Add to Render Queue button at the bottom of the Render Settings pane.
7. Click the Render All button in the Render Queue.
Export AAF file
- Go to the Deliver tab at the bottom of the screen.
- In Render Settings, scroll to the right and click Avid AAF.
- Click Browse next to Location.
- Select a location.
- Click Open.
- Click the Add to Render Queue button at the bottom of the Render Settings pane.
- Click the Render All button in the Render Queue.
5. Import EDL, XML, and AAF files to Premiere Pro
Congratulations—you’re now at the last few steps for bringing everything back to Premiere Pro!
- Go back to Premiere Pro.
- Go to File > Import.
- Select the EDL, XML, or AAF file to import your color-graded project from DaVinci to Premiere. Keep in mind that when you import any of these, they will bring a lot of new footage to the project bin so be ready to put them in a folder.
And you’re done!
Large Cloud File Transfer for Video Teams
You won’t believe how fast you can send terabytes of files with MASV.
Tips for a Successful Workflow
Needless to say, you’ll have different needs depending on the project. There is no one-size-fits-all roundtrip workflow, but these steps should give you a general idea of how your particular workflow should look. Always use the method that works best for you and your project rather than trying to force your project into a workflow that won’t serve your needs.
We also recommend talking to your colorist, if you’re working with one, to plan a strategy for the workflow before you get started so you know what to expect when it comes time to hand off your edit.
How to Transfer Files When Your Project is Complete
Now that your edit is ready to send, use MASV to get it where it needs to go. It’s a fast, secure, and easy way to send large files. With a 15 TB file size limit, enterprise-grade security features, over 300 global servers, and more, you can rely on MASV every time. Sign-up today for free!
MASV File Transfer
Try the fastest, most secure large file transfer service available, MASV.
