One of the most rewarding aspects of working as a producer in the video industry is collaborating with a wide range of talented people from all walks of life. Some of the projects I work on are smaller in scale and only require one or two crew members. Other times, I am part of a large team, with multiple video crews for one shoot or crews spread out across different locations.
In situations like the latter, it becomes hard to manage assets. As a producer, I need a seamless and secure way to receive all raw assets from my video crew, wherever they may be. Luckily, I have the perfect solution in MASV.
In this guide, I will show you my workflow for receiving raw footage from multiple video crews using MASV’s innovative file collection technology. I’ll also show you how I automate the process and ingest received files into cloud storage as well. MASV lets me do all of this from their platform, without having to dive into any code.
Table of Contents
Accelerated File Transfer and File Collection
Tired of slow transfers and complicated asset collection? Fix it with MASV.
My MASV Multi-Crew Workflow Explained
Before I get into the details of the workflow, it’s important to define the different tools available to me in MASV, as some terms might be unfamiliar to those unfamiliar with the product.
What is MASV?
MASV is a file transfer service in the cloud designed for transferring large media files as quickly as possible. It allows me to send all of my raw footage to clients and remote editors via their browser interface or Desktop app, which is available for Mac, Windows, and Linux.
What is a MASV Portal?
A MASV Portal is essentially your own private upload window in the cloud where you can request files to be uploaded by anyone in any location.
You can then organize these uploaded files by triggering downloads to your local machine or sending them directly to your other cloud storage services.
What is a MASV Watch Folder?
A MASV Watch Folder is a folder on your local machine that can automate file transfers. You can use it to upload files on your behalf or download files you receive to your computer. Watch Folders also monitor Portals activity. Once files are uploaded by your team or invited collaborators to the Portal, the Watch Folder syncs these files to your local machine.
Cloud Integrations
MASV offers native integrations with most cloud storage providers. These integrations enable you to ingest from your MASV account to linked cloud storage. The beauty of these integrations are their capacity to link with a Portal. When your team uploads files to your Portal, they are simultaneously stored in your connected storage.
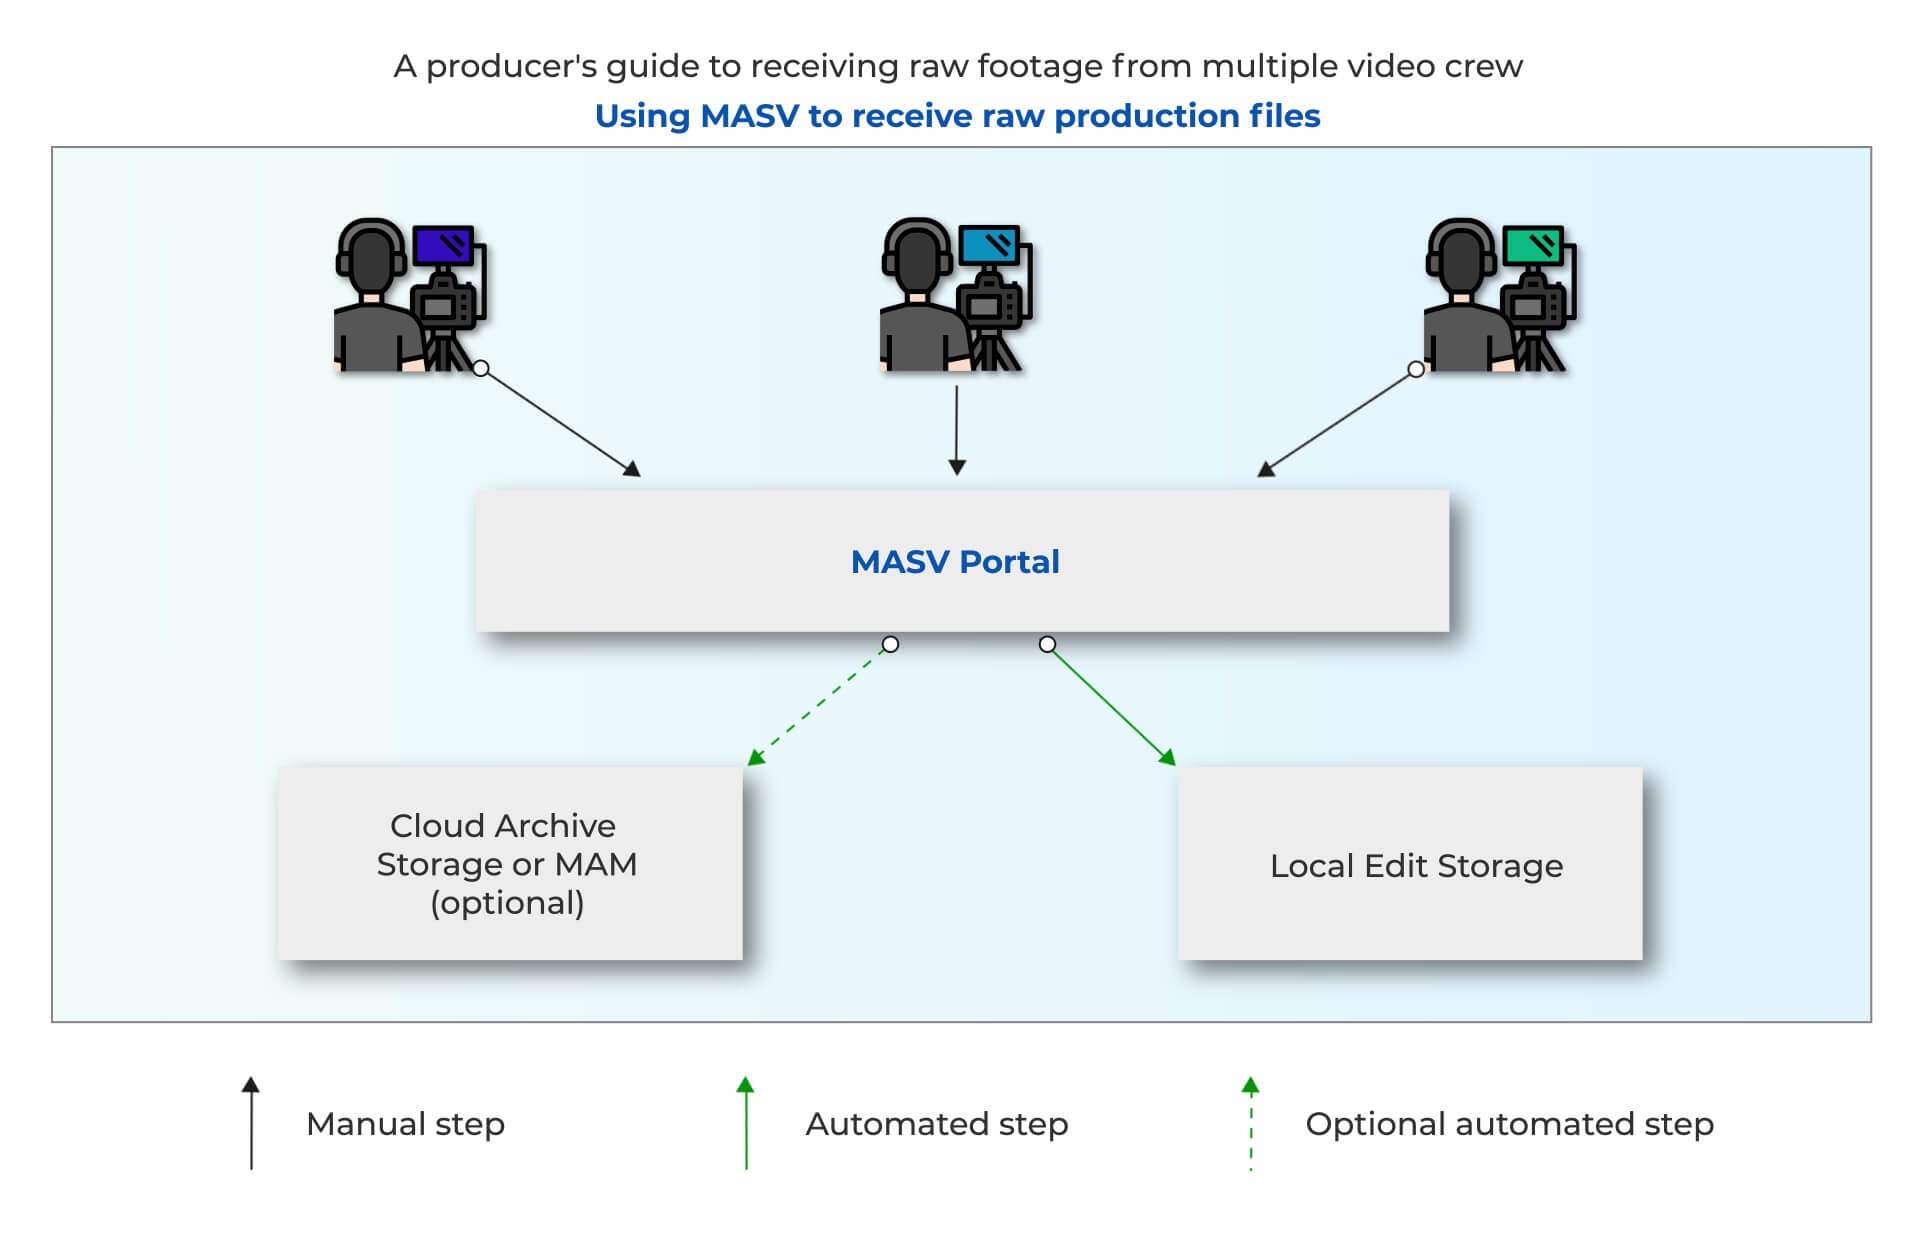
Now that you know the terms, I will use, below is a snapshot of my workflow:

- I create a Portal and connect my preferred cloud storage as a destination.
- I share the link to my Portal with my crew. Tip: add a line item to your digital call sheet with a link to the Portal so there is no confusion.
- I use the MASV Desktop app to create a Watch Folder automation to automatically download all files uploaded to my Portal to my project folder.
- My crew then offloads their camera card media into my Portal. They don’t need an account to upload. They just drag the files into the Portal uploader.
- My two MASV automations then kick in.
-
- All camera files are automatically stored in the cloud storage I connected.
- The Watch Folder triggers a download of Portal deliveries to my project folder.
- I receive an email notification that files have been uploaded to my Portal with sender information.
Types of Productions That Suit This Workflow
In essence, any video production project that has multiple crew or remote crew who create raw media can benefit from this workflow. Crew such as DP’s, camera operators, photographers, videographers, drone pilots, and sound recordists.
It’s always best practice to transfer rushes on set where possible. This creates two copies of the media the moment the shoot is complete.
Some project examples are:
- A shoot with multiple different DP’s filming in different locations on the same day.
- A multicam shoot involving freelance camera operators and sound recordists, where on-site transfer of rushes isn’t feasible due to time constraints or other circumstances.
- A shoot with a remote DP in another part of the world.
💡 Read More: Moving Multicam — Why Driving Plates Trusts MASV
Benefits of a Multi-Crew Workflow
Not so long ago, the most popular method for receiving rushes from crew was:
- Either shipping a hard drive;
- Or receiving multiple file transfer links from different file transfer services to download (huge) video files within your browser.
The problem with receiving rushes on hard drives is obviously the time delay. It takes time to deliver the mail — and in rare cases, they can also become lost in the mail which further exacerbates the delay.
The problem with downloading rushes from various file transfer services that the crew has uploaded to is how quickly things become disorganized and confusing. There is no single source of truth which adds another layer of mental strain…not to mention the strain of downloading hundreds of GB of footage from a browser.
This MASV workflow is not only a great time saver, it also makes the delivery of those valuable assets more secure and more organized as everything is uploaded to one place. Plus, your video crew don’t need a MASV account to deliver the assets to you.
With a few minutes of preparation before production begins, you can securely receive all of your assets into a predetermined local folder ready for post-production.
There is just something so neat about opening up Premiere Pro ready to start editing, navigating to “File > Import” and finding all of the rushes from the crew automatically downloaded, neatly organized and waiting in the post-production folder ready to edit!
By adding a cloud storage solution to the Portal, you can also create a workflow where you receive the rushes automatically to your local machine for archive and backup of raw footage — while simultaneously providing the rushes to remote editors without lifting a finger!
Your Video Team Deserves Better File Transfer
Don’t let large media files slow your team down. Give them the fastest file transfer available today.
Case Study: Receiving 750 GB From Multiple Cameras
As a case study of how to implement this workflow we are going to refer to a video project I recently produced for a live performance as an example.

The scope was a multicam shoot with five cameras. With the performance running for a couple of hours resulting in well over 750 GB worth of footage, it was decided beforehand that it’s best for the crew to deliver the rushes digitally after the shoot. Manually copying over that amount of data backstage with multiple cards after a long day with stage crew bumping out around us didn’t seem like the safest option!
We therefore instructed the crew to upload their footage to MASV Portals that were organized by crew personnel as well as camera number.
This footage was then automatically downloaded to the edit suite’s local SSD storage ready for post-production.
In order to make sure that the incoming footage was kept organized and ready to go when it came to editing, we needed to spend a couple of minutes setting up the workflow before the shoot.
Step-by-Step Guide: Creating the folder structure and MASV Portals
- Create your project folders
On the SSD that you will be editing from, create your project folder structure. In the raw footage folder, create a folder for each camera number or give it an easily identifiable name.
In this example we are creating five folders, one for each camera. Giving them a descriptive name will help with identifying the bins once they are imported into Premiere.

Tip: Create a template folder structure and duplicate it every time you start a new project; saving you time and creating a predictable folder structure for every project you work on.
- Sign-in to your MASV account. If you don’t yet have an account, signing-up takes just a couple of minutes.
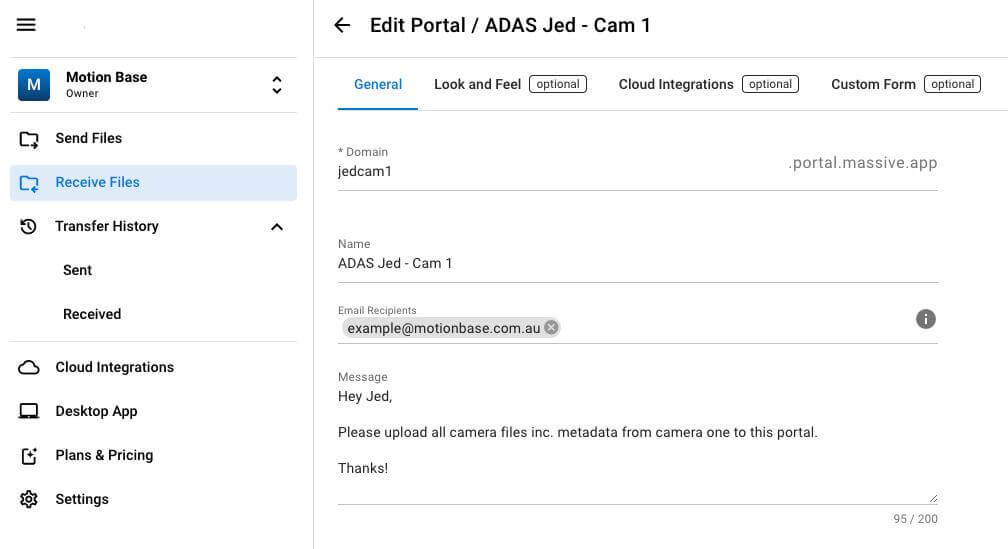
- Create MASV Portals
- Navigate to “Receive Files > Create Portal”
- Enter a custom domain. I like to be descriptive to help the crew identify which domain to upload to.
- Give your Portal a name and enter your email address as the recipient for the uploads. You can also specify if you want to be notified via email when someone uploads to this Portal.
- OPTIONAL: Change the look and feel. You can change the Portal’s background and button colors and add a logo, if you wish.

Click save and you’re done! The next step is to create a Portal for each camera or crew member you want to receive footage from. And yes, you may duplicate your existing Portal for efficiency.
As this project was a five camera multicam project, creating a Portal for each camera offers better organization and tracking. An alternative method is to create one Portal for all of the rushes. You would have to instruct the crew to place their camera name/description into separate folders before uploading.
The rushes will be organized once they are downloaded because MASV maintains folder and file structure from the upload.
MASV also provides the option to modify a Portal upload form with custom fields to capture unique metadata. Add fields for crew to specify their name, date, camera number, etc. The metadata is added to the upload as a separate file (choose between JSON, XML, or CXV). This is a great tool to help reduce manual verification.
Connect the Portals to a MASV Watch Folder
Now that we have the Portals set up ready to receive the footage, we just need to set up some Watch Folder automations in the MASV Desktop app. This will trigger an automatic download of the footage to your chosen folder(s) once the crew have finished uploading their rushes.
- Download the MASV app on your host machine if you haven’t already installed it.
- Log-in using your credentials.
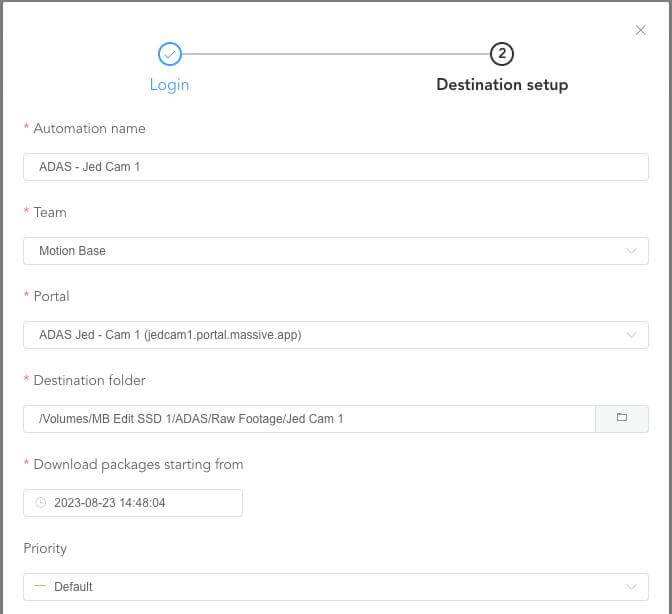
- Click on the “Automations” tab and select “New Automation”.
- Select the “Receive” option to create a Watch Folder automation.
- Give your automation a name. In this scenario I have named it after the project title, camera operator’s name, as well as the camera number.
- In the Portal section, select the Portal that corresponds to the destination folder on your computer.
- For example, this Watch Folder automation will download footage from the “ADAS Jed – Cam 1 Portal” to the “Raw Footage > Jed Cam 1” folder on the SSD when Jed uploads the rushes.
- You can also instruct MASV to download files from the Portal starting from a specific date and give the files a download priority. For this example, we are going to leave both options under their default value.
- Click “Create” and it’s done! Repeat this step for the next Watch Folder automation which in my case, will be for the rushes from the other cameras from the shoot.

Providing the Portal link to the crew
The last thing we need to do is provide links to the Portals so crews can upload their rushes.
I like to do this before the shoot, in the call sheet. That way, if the crew have any questions, these can be answered before production begins. I usually include the links under the technical details section of the call sheet so the crew can easily reference it when it comes to uploading.
By providing the links clearly marked for each camera in the digital call sheet, it makes supplying rushes incredibly easy for the crew. There is no sign-up or apps to download, they just click on the link and start uploading.

The workflow in action
Now that we have set up the MASV Portals, linked them to Watch Folders on the local SSD, and provided the upload links to the crew via the call sheet, the workflow is complete!
When the shoot is finished, all of the rushes from your crew will be automatically downloaded to the “Raw Footage” folder on your SSD, separated into folders according to the crew name, camera number/description. Simply import the raw footage folder into your chosen NLE and you’re good to go with the edit.
All of the rushes will be organized in bins within the NLE separated by camera number/name for easy file identification.
Tip: This workflow can be modified by project. For instance, for a shoot that requires b-roll from a DP working remotely in London, simply change “Michelle Cam 2” to “Michelle London <shoot date>.”
Syncing rushes to the cloud for archive storage
As mentioned earlier in the article, there may be times when you are not editing the raw material in-house. There are times when we require the help of additional editors.
If your editor is working remotely, it can be extremely inefficient to download rushes only to re-upload them to the cloud for the editor to access. A great way to cut out this manual work is to attach a cloud storage platform or media asset management (MAM) tool to your Portal.
Essentially, this means when the crew upload their rushes, MASV automatically copies the data across to storage in the cloud which you can then provide to the editor. You now have files downloaded to your local machine (as a backup) and available in the cloud for your editor to access.
This one extra step improves remote collaboration, provides better data redundancy, and saves you time. It cuts out the manual work of having to negotiate the supply of rushes between crew and different departments who are often situated in different parts of the world.
Automate Your Multi-Crew Workflow
With video production firmly embracing the cloud in all levels of production, it’s important to create an online workflow that keeps manual “busy work” to a minimum whilst also not sacrificing an eye for detail with rushes organization and security.
MASV is an excellent multimedia delivery and cloud integration tool. With it, you can:
- Better organize your team with easy and secure file collection Portals.
- Cut out the mundance with automated delivery of files to a local machine and cloud storage.
- Speed up large file workflows and be more productive, alone and as part of a team.
By implementing the above workflows, we have ensured that when an editor sits down to start a new project, the files are there, ready to go. It’s satisfying when things just work!
MASV File Transfer
Get 20 GB as a bonus when you sign-up for the fastest large file transfer service available today, MASV.