If you’re reading this, I assume you’re a video editor and your computer keeps lagging when you playback clips in Adobe Premiere Pro? If this is happening, you are likely working with videos that have a large file size. Perhaps 4K, 6K, or even 8K footage? While these resolutions are preferable in order to capture high-fidelity images and colors, they are a burden on modern video editing computers. Some processors just don’t have the computing power to stream all that heavy data.
Luckily, if you want to edit video with big beautiful footage without breaking your computer, this is one of those situations where you can have your cake and eat it too.
Video proxies, also known as proxy files, let you edit large videos without the lag and computational strain. Proxy files are lower-resolution copies of your original files. Creating a proxy of a video only takes a few clicks on your computer so let’s jump right into it. Check out the video below to learn more about Premiere’s proxy workflow. 👇
Need to Send Proxy Files?
Use MASV to share large files and entire folder structures with your team.
Table of Contents:
What Are Proxy Files?
A proxy video is essentially a smaller copy of your RAW videos. The result is a much smaller file which can be used during your editing.
Why Do I Need Proxy Files?
As mentioned, 4K+ video files are massive. Add in higher fps rates and different codecs that your video editor can’t read natively and you’re bound to run into playback issues. These issues aren’t just annoying, they kill your productivity. Slower playback means slower video editing, which means less time spent on other tasks.
And I think any video editor will agree, in this industry, time is money.
Video proxies give you your time back and let you work more efficiently.
Send Large Files. Fast.
MASV sends files at max speed to over 150 data centres around the world.
How Can I Create Video Proxies?
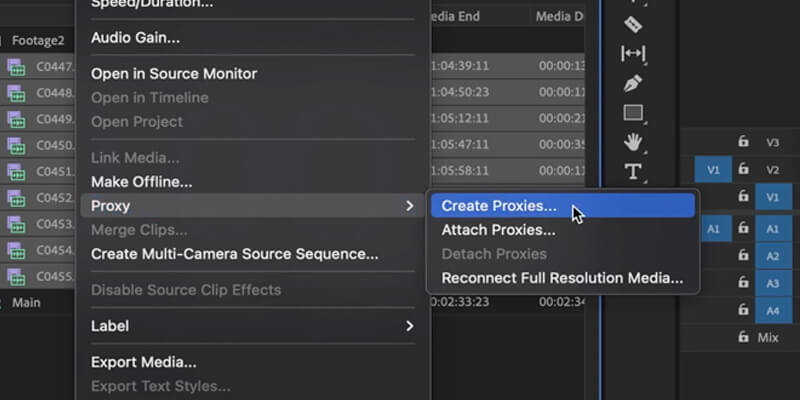
1. Select all the footage you want to create proxies for > right-click > and select ‘Proxy’ > ‘Create Proxies’.
2. In this new window, you can select the codec, either H.264 or QuickTime. I’m going to use QuickTime. Then in ‘Presets’, select the one that works best for you.
3. Below that, you can choose the destination for your proxies. We will leave them with the selected option so they can stay next to the original media in a new folder.
4. Click ‘OK’ and Adobe Media Encoder will open up and start rendering the video proxies immediately. This could take a few seconds or a few minutes depending on the length and size of your footage.
Once all the exports are done, the proxy files will automatically link in Adobe Premiere Pro. You can go ahead and close Media Encoder.
How Do I Switch Between Proxies and Original Files?
Once your proxy files have been created, you have to turn them on.
1. Head on over to your program window and navigate to the playback controls (play, pause, forward, etc.), on the right-hand side, you’ll see a plus (+) icon. Click the plus sign and find the ‘Toggle Proxies’ button.
2. Drag-and-drop the Toggle Proxy button into the playback controls bar.
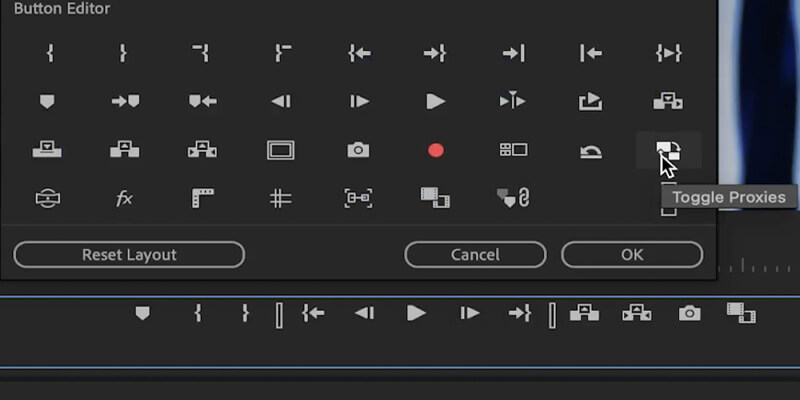
Now, when you click the toggle proxy button, you can switch between your proxy files and original media. You’ll notice that once your proxies have been turned on, scrubbing through your timeline is smooth and lag-free. Best of all, Adobe Premiere Pro lets you work with proxy videos but export at the original resolution. It’s a win-win!
How Do I Link Existing Proxy Files?
Some cameras, for example, can create video proxies directly in-camera when you record. If your camera can do this, try it out! It will save you a ton of rendering time later.
1. Right click on your selected footage > select ‘Proxy’ > ‘Attach Proxies’.
From here, you can locate and attach your proxy files.
How Do I Create A Proxy Encoding Presets?
If you have a specific proxy format that you like, you can create a custom encoding preset in Media Encoder.
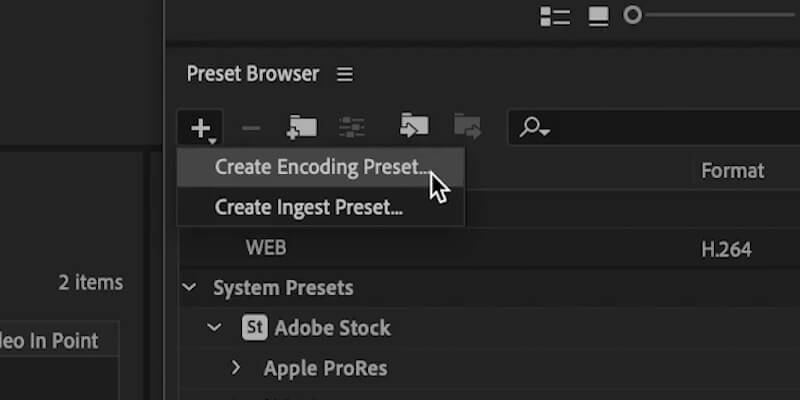
1. Go to Media Encoder and on the bottom left panel, click on the plus sign > ‘Create an Encoding Preset’.
2. A new dialog box will open up where you can customize your dimensions, codec, and export settings. Remember to lower the width and height of your video to reduce the file size. I like to stick to 720p.
3. You also have other options to modify and lower the size of your files. For example, if I choose H.264, you can lower the bitrate to the minimum so the footage is lighter. The footage won’t look great but remember, these are just proxies and we just need them to edit faster.
4. A cool tab in this video is the option to add a watermark. Adding a watermark gives you a visual cue that you’re working with a proxy file. Go to the ‘Effects’ tab > ‘Image Overlay’. Choose your image and adjust the position, size, and opacity.
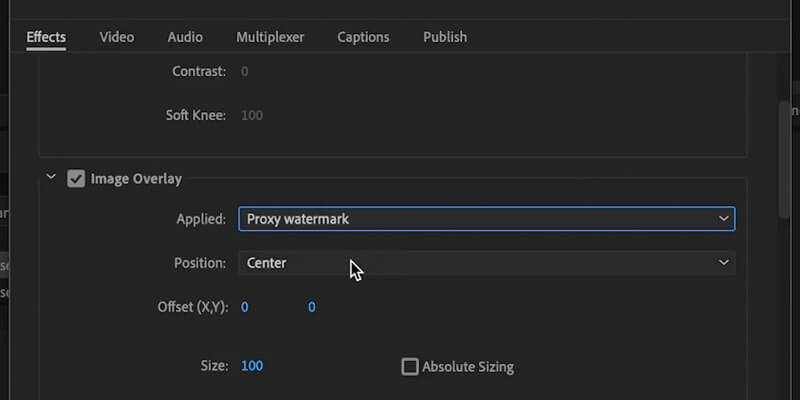
To finish, name your preset and hit ‘OK’. You will find your preset in user presets and groups.
How Do I Create A Proxy Ingest Preset?
A proxy ingest preset is the same as an encoding preset, but it applies to the files you ingest into Premiere Pro. With an ingest preset in place, you can quickly select the proxy preset you want and let the encoding run in the background.
1. Back in Media Encoder, click the plus sign > Create Ingest Preset.
2. Check transcode files to destination and select a destination.
3. Select a format and your preset. You can select the Encoding preset we made earlier.
4. Back in Premiere Pro, select your footage > Create Proxies > ‘Add Ingest Preset’.
Locate the ingest preset we created and there you go.
How Do I Send Proxy Files?
Video proxies will reduce the file size of your RAW media, which is better for video editing and remote collaboration. Imagine the time it would take if everyone on your production team had to send, receive, and work with RAW files exclusively? It’s far easier to share video proxies and link the original files at the end. It’s faster too as those original media files are probably being shipped over on a hard drive.
But, there’s a catch: proxy files are still big files. If you create a proxy video of a 30-min, 4K, 60 FPS file, you won’t miraculously produce a 100 MB video. You still have to deal with hundreds of gigabytes — and that’s where MASV comes in.
MASV is the fast, easy, and secure way for filmmakers to share large media files with clients, teammates, and collaborators. With MASV, you can send proxy files, share RAW footage, production files, and other hi-res assets anywhere in the world. We can deliver file packages of unlimited size over the cloud, at max speed — and we maintain folder structures.
Because proxies are closely linked to project files, their file structures must be identical – even when transferred to other users. By maintaining folder structure, MASV ensures your proxy workflow remains as smooth and efficient as possible. You can even render, export, and send files in one motion with our Premiere Pro plug-in.
Get started with MASV today and enjoy free transfer credits every month to send proxy videos — or any large video file(s) eating up space on your computer.
MASV File Transfer
Get started for free and enjoy the fastest, large file transfer service available today, MASV.